Written by Nodebase Team member EarthNodeChile (Nico Verboven)
This is the multi-page printable view of this section. Click here to print.
Configuration
How to configure your Earthnode validator?
- 1: Node Architecture Design
- 2: Validator Sentry config.toml
- 3: Used Ports
- 4: Update Website and Logo
- 5: Firewall Settings
1 - Node Architecture Design
An architectural overview on how to configure your validator and sentry nodes
Table Of Contents
Validator Node Architecture Design
Tendermint relies on the set of validators to secure the network. The role of the validators is to run a full-node and participate in consensus by broadcasting votes which contain cryptographic signatures signed by their private key. Validators are connected to each other through the p2p connections.
Validators are responsible for ensuring the that the network can sustain denial of service attacks.
Common Attacks
Distributed Denial of Service (DDoS)
In the WM Chain, a validator node has a fixed IP address and RESRfule API port connected to the internet, which makes it vulnereable. DDoS attacks will halt the vote messages between validators and prevent blocks from being committed. If more than 1/3 of the network suffer from a DDoS attack it can halt the chain.
Compromise of keys
The most valuable asset of a validator are the keys it uses to sign blocks. An attacker who has control of the validator can get anything they want signed by the keys.
Single Node Validator Setup
This approach is deemed unsafe, though you could set firewall white listings to establish links to only trustful peers. If an IP address is discovered it becomes vulnerable, and it is problematic to change.
- Pro: easy to implement
- Con: not a flexible setup
=> This approach should be avoided, since it will still make your validator vulnerable.
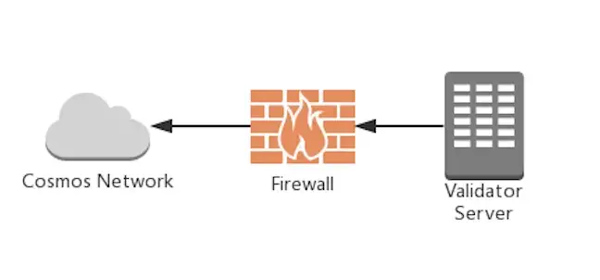
picture
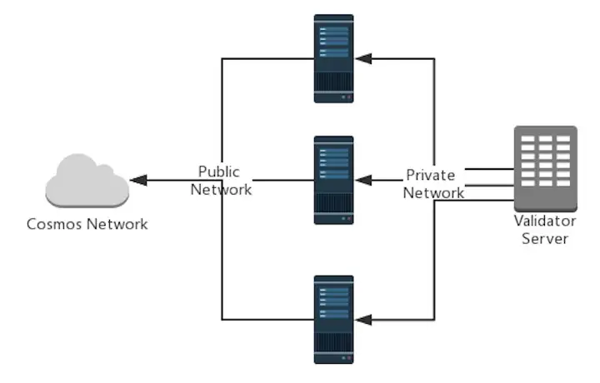
Single Layer Sentry Node Setup
In this setup, the validator node hides behind its two-layer sentry nodes. Only sentry nodes use public internet. The validator nodes do not need a public IP address, so discovery of IP addresses to target with DDos is much harder. Multiple Sentry Nodes can be connected to a a single validator to further mitigate the risk of DDoS Attacks.
Virtual Private Cloud (VPC)
If you use a cloud solution, you can setup a Virtual Private Cloud (VPC) to host your relay and validator nodes. VPC networks provide a more secure connection between resources because the inaccessible from the public internet and other VPC networks. Traffic within a VP network doesn’t count against bandwidth usage.
In this setup, the relay talks to the validator >node through a secure private connection. The >relay node will then also connect through an >external_address with the p2p validator >network.
picture
- Pro: Efficient to mitigate DDos attacks
- Con: Attacker can only attack the validator node, if they gain access to the private network.
Public Cloud
In this setup, the relay and validator node are both connected to the internet. But the validator node is hidden behind the relay node. The relay node will prevent gossipping the IP-address of the validator node.
This is less secure than using a VPC network, >since the validator node, although unknown to the >rest of the peers, is still connected to the >public internet and could be discovered.
2 - Validator Sentry config.toml
How to setup your validator and sentry nodes
Table Of Contents
Local Configuration Validator-Sentry Setup
The validator will only talk to the Sentry nodes that are provided. While sentry nodes have the ability to talk to the validator node on the private channel and talk to public nodes elsewhere on the internet. When initializing nodes there are six parameters in the config.toml which are important
- pex: boolean value. It tursn the peer exchange reactor (gossip protocol) on or off in a node. When
pex=false, only the list of nodes in thepersistent_peerslist are available for connection. - persistent_peers: commma separated list of nodeid@ip:port values that define a list of peers that expected to be online at all times and the node is expected to be able to connect to them. If some nodes are not available, they will be skipped and later retried for a while, before completely dropping them. If no nodes are available from the list and
pex=false, then the node will not be able to join the network. - private_peer_ids: comma-separated list of nodeid values, that should not be gossiped at all times. This setting tells which nodes should not be handed out to others
- add_book_strict: Turn this off if some of the nodes are on a LAN IP. If off, non routable IP address, like addressed on a private network can be added to the address book.
- unconditional_peer_ids: comma seperated list of nodeIDs. These nodes will be connected no matter the limit of inbound and outbound peers. This is useful when address_books of sentry nodes are full.
- seed_mode. This is used to jump start other nodes by providing a list of peers that the node can connect to.
NodeIDs
Important: Nodes in persistent_peers have the format nodeID@ip:port.
nodeID. The ID of your validator. This can be retrieved with the command
ayad tendermint show-node-id --home /opt/ayaor use the nodebase showkeys script
./showkeys.ship The IP-address of your relay node
port: The p2p port your relay node is listening on. By default it is 26656
For the private_peer_ids and unconditional_peer_ids, only put the nodeID (without the @ip:port)
Validator Node Configuration
| Config Option | Setting |
|---|---|
| seed_mode | false |
| pex | false |
| persistent_peers | list of sentry nodes |
| private_peer_ids | none |
| unconditional_peer_ids | optionally sentry node IDs |
| addr_book_strict | false |
The validator node should have
pex=falseso it does not gossip to the entire network. Thepersistent_peerswill be your sentry nodes.private_peer_idscan be left empty, as the validator is not trying to hide who it is communicating with. Settingunconditional_peer_idsis optional for a validator since they will not have a full address book. Since the validator is on a private network and it will connect to the sentry nodes also on a private network,addr_book_strict=falsehas to be set.
Sentry Node Configuration
| Config Option | Setting |
|---|---|
| seed_mode | false |
| pex | true |
| persistent_peers | validator node, optionally other sentry nodes |
| private_peer_ids | validator node ID |
| unconditional_peer_ids | validator node ID, optionally other sentry node IDs |
| addr_book_strict | true |
| external_address | set this to “x.x.x.x:26656”, where x.x.x.x is the sentry’s node public IP-Address |
The sentry nodes should be able to talk to the entire network hence why
pex=true. Thepersistent_peersof a sentry node will be the validator, and optionally other sentry nodes. The sentry nodes should make sure they do not gossip the validator’s ip, ’ to do this you must put the validator nodeID as aprivate_peer_ids. Theunconditional peer IDswill be the validator node ID and optionally other sentry node IDs. Since the sentry nodea must be able to connect to other p2p peers,addr_book_strictmust be set totrue, otherwise no inbound connections are made. Theexternal_addressneeds to be set to your sentry’s node public IP-address of the form“x.x.x.x:26656”. This is the connection address and port that will be gossipped to other nodes for connecting back to your sentry.
IMPORTANT Do not forget to secure your node’s firewalls when setting them up.
About Gossipping
Nodes will gossip their known peers that are not marked as a private node to other nodes on the p2p network.
will be gossipped.
If you plan to install sentry nodes, the recommendation is to setup the sentry first, then after that install the validator node and directly connect it to the relay. If your validator node was already installed, it’s already gossipped to other peers. And you want to prevent that. You can fix this by blocking the p2p ports to non-relays with a firewall, and the peers will eventually remove your validator. But ideally, the installation of a validator should be done with relay setup in mind to make it a complete private installation. This requires some handshaking.
3 - Used Ports
What ports does aya use?
By default the follow ports are used by aya
- 26656
- pnp networking port to connect to the consensus network
- On a validator this port needs to be exposed to sentry nodes
- On a sentry node this port needs to be exposed to the open internet
- This is the port validators and sentries use to communicate to each other
- 26657
- Consensus RPC port.
- Some tools, example querying tools, use this port to query blockchain status.
- You should not directly expose this port.
- This should be shielded from the open internet.
- 26658
- Out of process ABCI app
- This should be shielded from the open internet
- 29090
- the gRPC server port. This is used for gRPC server communication with
- Cosmos SDK application layer. With this you can query banking, staking and - delegation information from Cosmos SDK.
- Example, some monitoring services might use this communication mechanism since its much faster than RESTful.
- This should be shielded from the open internet
Some optional ports that might be used by aya are as follows
- 26600
- Prometheus stats server
- System stats about the ayad process
- Needs to be enabled in the config file
- This should be shielded from the open internet, unless you want monitor your validator consensus metrics
- 1317
- The REST server
- for automated management of anything you can do with the CLI
- This should be shielded from the open internet.
More here on endpoints
Note: Monitoring tools that are installed use additional port, ex Grafana uses port 3000
IMPORTANT: For ports 1317 and 26657, you way want to use them as a RESTful endpoint by proxy-ing them to an external interface via an http proxy like Nginx or Coddy. The idea is to treat them like a web service for RESTful requests to the RPC ports done over https. You may configure rate limiting on the http proxy or make request with user authentication using a web app. This way you are not exposing the ports directly and your node is protected from receiving too many request suddenly.
4 - Update Website and Logo
How to Update your ENO’s Website link and Logo for them to appear online
Written by Community Contributer Cardano SHAMROCK
Update Website And Description
On your Validator Node run
1ayad tx staking edit-validator --website "https://www.example.com" --details "ENO Description" --from ACCOUNT --home /opt/ayaNote: Ensure to replace ACCOUNT with your own ENO’s Account name, replace https://www.example.com with your own site address, replace ENO Description with your own preferred details.
Update Logo
Create Account on Keybase: https://keybase.io
Add logo to Keybase
Copy Key from Keybase dashboard
On your Validator Node run
1ayad tx staking edit-validator --identity=KEYBASEKEY --from ACCOUNT --home /opt/ayaNote: Ensure to replace ACCOUNT with your own ENO’s Account name, replace KEYBASEKEY with the key you obtained while signing up for Keybase
5 - Firewall Settings
How to configure your firewall in a validator-sentry configuration
These instructions assume a Validator-Sentry architecture.
Sentry Node
Apply these firewall settings on your sentry node
| |
Since the sentry node has pex enabled, connections from any machine to the p2p port (26656) needs to be allowed, so that other nodes can talk to the sentry for p2p communication of consensus messages.
The firewall settings above only allows ssh login from the given machine with IP-address IP, which should be the client machine you want to login from. This is good practice and limits the attack vector on your server.
Note that with a proper VPN solution, such as tailscale, this specific firewall rule can also be omitted, giving you the highest level of security. Tailscale can handle SSH login through its ACL access rules.
When done
| |
Validator Node
Apply these firewall settings on your validator node
| |
The validator firewall will be configured to make only outgoing p2p connections to the sentry nodes. Only allowing outgoing p2p connections to the sentry nodes further limits the attack vector on your validator node, since we don’t have to open the p2p port. See the manual setup guide on how to configure the sentry/validator correctly for this.
The firewall settings above only allows ssh login from the given machine with the give IP-address IP, which should be the client machine you want to login from.This is good practice and limits the attack vector on your server.
Note that with a proper VPN solution, such as tailscale, this specific firewall rule can also be omitted, giving you the highest level of security. Tailscale can handle SSH login through its ACL access rules.
If you have prometheus=true metrics logging enabled in the config.toml, you should allow the prometheus listen port as well.
| |
where IP is the address of your prometheus server.
When done
| |
Grafana
Additional services can be opened such as grafana as follows. I don’t recommend to run your grafana server on the same machine as your validator. This should be discouraged. Grafana typically uses port 3000.
| |
When done
| |
Prometheus
If you want to use Prometheus metrics, you should consult with the metrics exporter tool which port it uses for exporting metrics. Prometheus specific setup recommendations and installation instructions will be released shortly, when the nodebase releases its nodebase monitoring service.