NodeBaseDevs Documentation site
This is the multi-page printable view of this section. Click here to print.
Documentation
- 1: Overview
- 2: Getting Started
- 3: Tools
- 3.1: Ayaview
- 4: Configuration
- 4.1: Node Architecture Design
- 4.2: Validator Sentry config.toml
- 4.3: Used Ports
- 4.4: Update Website and Logo
- 4.5: Firewall Settings
- 5: Testnet
- 6: Tutorials
- 6.1: Public DevNet Tutorials
- 6.1.1: 1. Offline, Air-Gapped, Machine creation for Aya Validator Cold Key Storage
- 6.1.2: 2. Validator Node Manual Installation
- 6.2: Public Testnet Tutorials
- 7: Contribution Guidelines
1 - Overview
Overview
Written by Nodebase Team member EarthNodeChile (Nico Verboven)
In the documentation section, you will find resources to setup and configure your Earthnode successfully. Detailed technical guides and step-by-step tuturial will be available to help those with less technical knowledge.
NodeBaseDevs is providing more than just technical knowledge.
The team is working on custom developed tools to assist Earthnode operators in installation, configuration, monitoring and alerting.
Where should I go next?
- Getting Started: Get started with running an EarthNode on the WorldMobile Chain
- Tutorials: Easy to follow step-by-step guides.
- Configuration: Detailed configuration information
2 - Getting Started
Get started running your nodes!
The Getting Started will guide you through thte site material
Prerequisites
You must be a WorldMobile Earthnode operator with access to the private or public tesnet. If you don’t have access yet, contact a moderator in the WorldMobile telegram groups to request the access form.
Installation
You will need to have access to a linux server for installation of the WM Earthnode validator. Hardware requirements is minimal 2 cores, 4GB RAM without grafana and 8GB RAM with grafana and 40GB DISK space-
Setup
The earthnode installation package provided on testnet gives you everything you need to install a validator node. At the NodeBaseDevs site you will find addtional setup instructions for installing relay nodes and complete configuration guidelines.
2.1 - Sentry Node Installation
Installation Guide with script
Table Of Contents
Installation
Installing a sentry node requires a different installation procedure than a validor node.
The install_node.sh script provided by the WM team only covers validator nodes, and does not apply for sentry nodes. With some small adjustments this script can be adjusted to be used to install sentry nodes
Sentry nodes dont have operator keys, since they are not part of the consensus voting.
NodebaseTools
The NodeBaseDevs team created an install_sentry.sh installation script.
This script is part of the bundled nodebase tools package release package that can be found in the github releases
Instructions
Download the nodebase tools zipfile
wget https://github.com/nodebasewm/download/archive/refs/tags/nodebasetools.zipunzip this file, it will create the folder download-nodebasetools/.
copy the install_sentry.sh to your earthnode_installation folder
The other scripts in the zip you can put wherever you want. Recommendation is to put them in /usr/local/bin
make sure executable permissions are set on the scripts
chmod +x install_sentry.shrun the script with a moniker name for your sentry from within the earthnode installation folder
./install_sentry.sh -m MONIKER_NAMEUnlike a validator node, no registration is needed for sentry nodes.
wait for the node to be synced to full height from the snapshot point. The installation script will terminate automatically when the node is synced to latest block height
Configuration
Please continue with following the Sentry-Validator configuration instructions in Configuration to configure your nodes accordingly after installation completes.
Step-by-Step Manual Installation
Alternatively, you can follow our step-by-step sentry node installation guide for manual installation. You can find this in our Tutorial Section
3 - Tools
NodeBaseDevs Tools
The NodeBaseDevs team is continuously adding scripting and tooling to its github release page
You can download the entire tool package as follows.
| |
The package currently contains:
- install_sentry.sh installation script
- addresses.sh : shows all your node address, useful for setup
- validators.sh: show all bonded validators by moniker/address and status
- ayafix.sh: post installation fix to setup cosmovisor.service and fix links
3.1 - Ayaview
Ayaview Console
Developed by Nodebase Team member EarthNodeChile (Nico Verboven)
Table Of Contents
Introduction
Ayaview is a local monitoring tool for your validator node.It can be used besides a setup based on Grafana-Prometheus for light-weight direct monitoring.
It has a very intuitive console view, written entirely in Golang for performance. Ayaview monitors your validator status and blocks produced on chain, as also system metrics and peer information.
It can be run entirely standalone, started/stopped as many times you want without affecting your node.
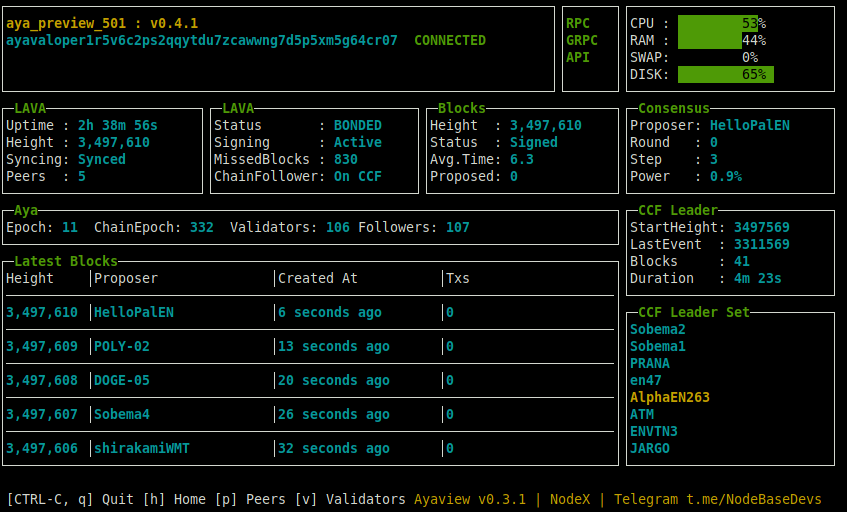
AyaView
Ayaview provides node status display of your node. Uptime / peers / blocks proposed and system metrics.
picture
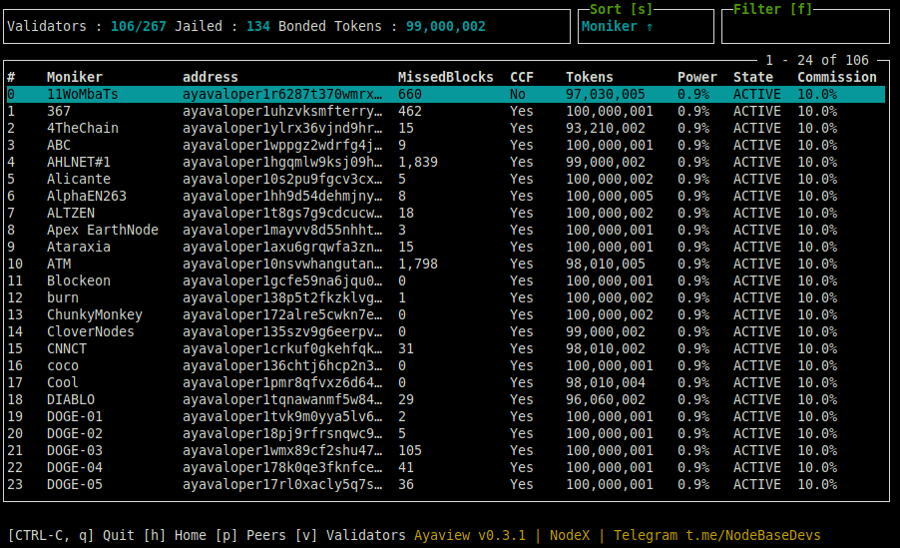
Validators
The validator view display active validators and their current status. The information displayed is
- Moniker and address
- MissedBlocks : How many blocks missed in slashing window
- CCF : Checks if validator is on the Cardano ChainFollower list
- Tokens: How many delegated tokens
- Power: Voting power
- State: Signing state
- Commission: Commission rate set on this validator
picture
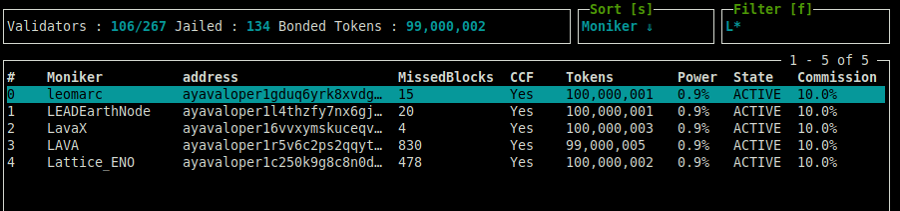
Additionally, the view supports filtering and sorting.
picture
Sorting Validator View
Press the key ’s’ to sort on different columns and order. By repeating pressing the ’s’ key you will be able to cycle through different sort options, display in the upper right corner
Filter Validator View
Wildcard filtering is also added. The filter implements glob based style filtering (similar to file path filters on command line)
By pressing the key ‘f’ you enter the filter node, and you can start typing your filter, display in the upper right corner, The section will be highhlighted in yellow. And the filter is applied while typing in real-time updates. Because the filter captures the input, you need to press the ESC button to end filter setup, so you can go back and change the tab display
- Important: Only use the filtering patterns ‘*’ and ‘?’. The filter currently doesnt support [abc] and [a-z] style filters
Peers Display
A powerful feature of ayaview is to show peer connections by pressing the key ‘p’. This will show you all peer connections with their latency and location. Also a live view of the P2P connection details are shown when selecting a peer, like transaction speed/s.
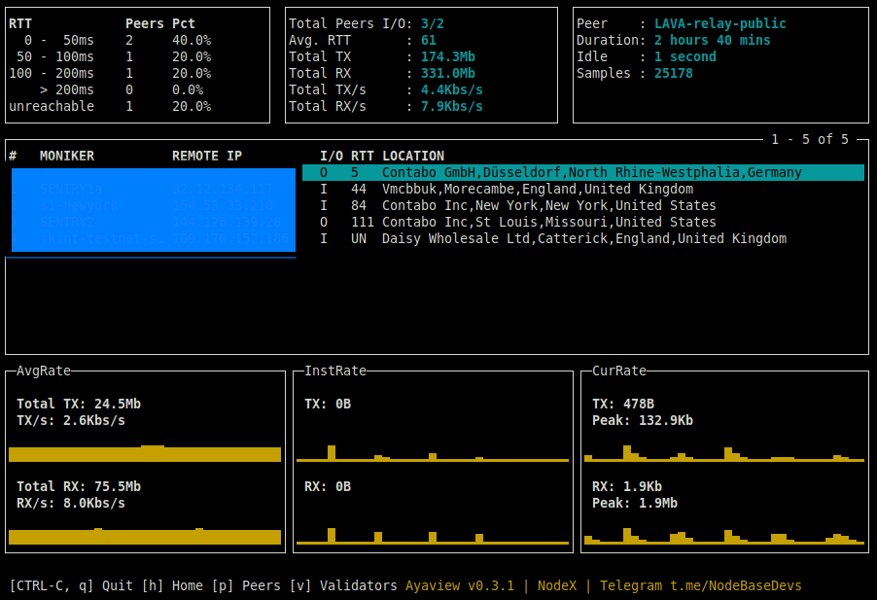
picture
Installation Instructions
Download ayaview from nodebasewm github and unzip as follows
| |
After configurating ayaview using the configuration instructions, you can start ayaview in any open terminal window.
| |
A configuration file is provided, which must be used in the following conditions:
- You run ayaview on a sentry but want to see node status of your validator. (blocks signed/proposed )
- You changed the default ports of grpc (29090) or rpc (25567) or api (1317)
- You want the change the default update interval for system metrics
- You want to have a default filter applied to validators
Use ayaview with config file :
| |
If you run ayaview on your validator, it will automatically discover your validator node and connect to it.
Configuration
The configuration of ayaview is done through a config.toml configuration file. A default config file is delivered part of the installation.
Note
This is NOT the same config.toml as the aya config.toml. Ayaview has its own config.toml file, which is part of the zip package.Ayaview on Sentry Node
If your run ayaview on a sentry node, you will only see chain activity such as blocks and chain events. If you want to see the validator node status information this sentry is pointing to, you will have to pass a config.toml file to ayaview. Ayaview will clearly display on the Home tab if your node is a validator or a sentry node.
You can use the config.toml delivered as part of ayaview.zip. Edit the value of validator in the config.toml with the address of your validator node.
This address is the ayavalop BECH32 notation of your validator node. It must start with the ayavalop prefix, any other BECH32 notation will NOT work.
To retrieve your validators operator address, take a look at the Q&A in Testnet
ex.
| |
Ayaview on Validator Node
When running ayaview on a validator node, it will now detect that your node is a validator, and configure itself automatically without the need of a config file.
So no configuration file is needed, unless off course you intent to observe a different node, or changed ports.
GRPC/RPC/API Ports
If you changed the default port of your node’s GRPC (29090) or RPC endpoint (26657), you will have to also change the grpc-address or rpc-address in the config file and pass the config file to ayaview.
The API part (default 1317) is needed to query WorldMobile specific APIs, such as the chainfollower information. YOu will have to enable this API in the ayad configuration app.toml under [api] section.
System update Interval
Optionally, you can control the interval to update system metrics and node status. Block and consensus updates are updated real-time.
Config-File
| |
4 - Configuration
How to configure your Earthnode validator?
Written by Nodebase Team member EarthNodeChile (Nico Verboven)
4.1 - Node Architecture Design
An architectural overview on how to configure your validator and sentry nodes
Table Of Contents
Validator Node Architecture Design
Tendermint relies on the set of validators to secure the network. The role of the validators is to run a full-node and participate in consensus by broadcasting votes which contain cryptographic signatures signed by their private key. Validators are connected to each other through the p2p connections.
Validators are responsible for ensuring the that the network can sustain denial of service attacks.
Common Attacks
Distributed Denial of Service (DDoS)
In the WM Chain, a validator node has a fixed IP address and RESRfule API port connected to the internet, which makes it vulnereable. DDoS attacks will halt the vote messages between validators and prevent blocks from being committed. If more than 1/3 of the network suffer from a DDoS attack it can halt the chain.
Compromise of keys
The most valuable asset of a validator are the keys it uses to sign blocks. An attacker who has control of the validator can get anything they want signed by the keys.
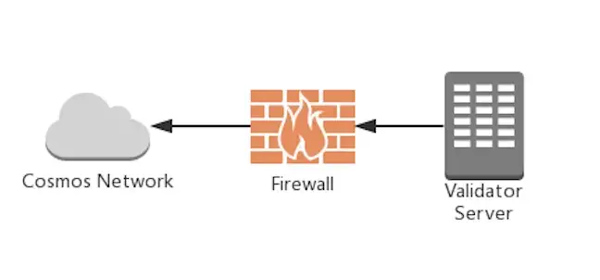
Single Node Validator Setup
This approach is deemed unsafe, though you could set firewall white listings to establish links to only trustful peers. If an IP address is discovered it becomes vulnerable, and it is problematic to change.
- Pro: easy to implement
- Con: not a flexible setup
=> This approach should be avoided, since it will still make your validator vulnerable.
picture
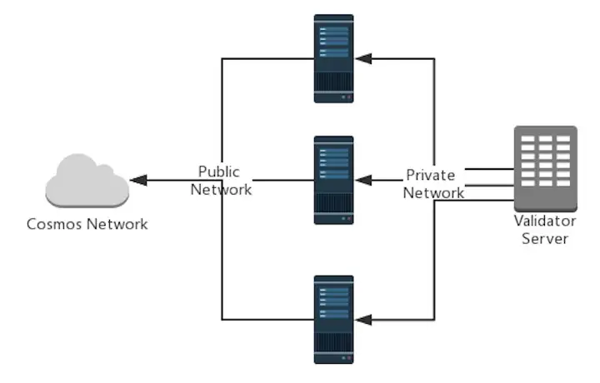
Single Layer Sentry Node Setup
In this setup, the validator node hides behind its two-layer sentry nodes. Only sentry nodes use public internet. The validator nodes do not need a public IP address, so discovery of IP addresses to target with DDos is much harder. Multiple Sentry Nodes can be connected to a a single validator to further mitigate the risk of DDoS Attacks.
Virtual Private Cloud (VPC)
If you use a cloud solution, you can setup a Virtual Private Cloud (VPC) to host your relay and validator nodes. VPC networks provide a more secure connection between resources because the inaccessible from the public internet and other VPC networks. Traffic within a VP network doesn’t count against bandwidth usage.
In this setup, the relay talks to the validator >node through a secure private connection. The >relay node will then also connect through an >external_address with the p2p validator >network.
picture
- Pro: Efficient to mitigate DDos attacks
- Con: Attacker can only attack the validator node, if they gain access to the private network.
Public Cloud
In this setup, the relay and validator node are both connected to the internet. But the validator node is hidden behind the relay node. The relay node will prevent gossipping the IP-address of the validator node.
This is less secure than using a VPC network, >since the validator node, although unknown to the >rest of the peers, is still connected to the >public internet and could be discovered.
4.2 - Validator Sentry config.toml
How to setup your validator and sentry nodes
Table Of Contents
Local Configuration Validator-Sentry Setup
The validator will only talk to the Sentry nodes that are provided. While sentry nodes have the ability to talk to the validator node on the private channel and talk to public nodes elsewhere on the internet. When initializing nodes there are six parameters in the config.toml which are important
- pex: boolean value. It tursn the peer exchange reactor (gossip protocol) on or off in a node. When
pex=false, only the list of nodes in thepersistent_peerslist are available for connection. - persistent_peers: commma separated list of nodeid@ip:port values that define a list of peers that expected to be online at all times and the node is expected to be able to connect to them. If some nodes are not available, they will be skipped and later retried for a while, before completely dropping them. If no nodes are available from the list and
pex=false, then the node will not be able to join the network. - private_peer_ids: comma-separated list of nodeid values, that should not be gossiped at all times. This setting tells which nodes should not be handed out to others
- add_book_strict: Turn this off if some of the nodes are on a LAN IP. If off, non routable IP address, like addressed on a private network can be added to the address book.
- unconditional_peer_ids: comma seperated list of nodeIDs. These nodes will be connected no matter the limit of inbound and outbound peers. This is useful when address_books of sentry nodes are full.
- seed_mode. This is used to jump start other nodes by providing a list of peers that the node can connect to.
NodeIDs
Important: Nodes in persistent_peers have the format nodeID@ip:port.
nodeID. The ID of your validator. This can be retrieved with the command
ayad tendermint show-node-id --home /opt/ayaor use the nodebase showkeys script
./showkeys.ship The IP-address of your relay node
port: The p2p port your relay node is listening on. By default it is 26656
For the private_peer_ids and unconditional_peer_ids, only put the nodeID (without the @ip:port)
Validator Node Configuration
| Config Option | Setting |
|---|---|
| seed_mode | false |
| pex | false |
| persistent_peers | list of sentry nodes |
| private_peer_ids | none |
| unconditional_peer_ids | optionally sentry node IDs |
| addr_book_strict | false |
The validator node should have
pex=falseso it does not gossip to the entire network. Thepersistent_peerswill be your sentry nodes.private_peer_idscan be left empty, as the validator is not trying to hide who it is communicating with. Settingunconditional_peer_idsis optional for a validator since they will not have a full address book. Since the validator is on a private network and it will connect to the sentry nodes also on a private network,addr_book_strict=falsehas to be set.
Sentry Node Configuration
| Config Option | Setting |
|---|---|
| seed_mode | false |
| pex | true |
| persistent_peers | validator node, optionally other sentry nodes |
| private_peer_ids | validator node ID |
| unconditional_peer_ids | validator node ID, optionally other sentry node IDs |
| addr_book_strict | true |
| external_address | set this to “x.x.x.x:26656”, where x.x.x.x is the sentry’s node public IP-Address |
The sentry nodes should be able to talk to the entire network hence why
pex=true. Thepersistent_peersof a sentry node will be the validator, and optionally other sentry nodes. The sentry nodes should make sure they do not gossip the validator’s ip, ’ to do this you must put the validator nodeID as aprivate_peer_ids. Theunconditional peer IDswill be the validator node ID and optionally other sentry node IDs. Since the sentry nodea must be able to connect to other p2p peers,addr_book_strictmust be set totrue, otherwise no inbound connections are made. Theexternal_addressneeds to be set to your sentry’s node public IP-address of the form“x.x.x.x:26656”. This is the connection address and port that will be gossipped to other nodes for connecting back to your sentry.
IMPORTANT Do not forget to secure your node’s firewalls when setting them up.
About Gossipping
Nodes will gossip their known peers that are not marked as a private node to other nodes on the p2p network.
will be gossipped.
If you plan to install sentry nodes, the recommendation is to setup the sentry first, then after that install the validator node and directly connect it to the relay. If your validator node was already installed, it’s already gossipped to other peers. And you want to prevent that. You can fix this by blocking the p2p ports to non-relays with a firewall, and the peers will eventually remove your validator. But ideally, the installation of a validator should be done with relay setup in mind to make it a complete private installation. This requires some handshaking.
4.3 - Used Ports
What ports does aya use?
By default the follow ports are used by aya
- 26656
- pnp networking port to connect to the consensus network
- On a validator this port needs to be exposed to sentry nodes
- On a sentry node this port needs to be exposed to the open internet
- This is the port validators and sentries use to communicate to each other
- 26657
- Consensus RPC port.
- Some tools, example querying tools, use this port to query blockchain status.
- You should not directly expose this port.
- This should be shielded from the open internet.
- 26658
- Out of process ABCI app
- This should be shielded from the open internet
- 29090
- the gRPC server port. This is used for gRPC server communication with
- Cosmos SDK application layer. With this you can query banking, staking and - delegation information from Cosmos SDK.
- Example, some monitoring services might use this communication mechanism since its much faster than RESTful.
- This should be shielded from the open internet
Some optional ports that might be used by aya are as follows
- 26600
- Prometheus stats server
- System stats about the ayad process
- Needs to be enabled in the config file
- This should be shielded from the open internet, unless you want monitor your validator consensus metrics
- 1317
- The REST server
- for automated management of anything you can do with the CLI
- This should be shielded from the open internet.
More here on endpoints
Note: Monitoring tools that are installed use additional port, ex Grafana uses port 3000
IMPORTANT: For ports 1317 and 26657, you way want to use them as a RESTful endpoint by proxy-ing them to an external interface via an http proxy like Nginx or Coddy. The idea is to treat them like a web service for RESTful requests to the RPC ports done over https. You may configure rate limiting on the http proxy or make request with user authentication using a web app. This way you are not exposing the ports directly and your node is protected from receiving too many request suddenly.
4.4 - Update Website and Logo
How to Update your ENO’s Website link and Logo for them to appear online
Written by Community Contributer Cardano SHAMROCK
Update Website And Description
On your Validator Node run
1ayad tx staking edit-validator --website "https://www.example.com" --details "ENO Description" --from ACCOUNT --home /opt/ayaNote: Ensure to replace ACCOUNT with your own ENO’s Account name, replace https://www.example.com with your own site address, replace ENO Description with your own preferred details.
Update Logo
Create Account on Keybase: https://keybase.io
Add logo to Keybase
Copy Key from Keybase dashboard
On your Validator Node run
1ayad tx staking edit-validator --identity=KEYBASEKEY --from ACCOUNT --home /opt/ayaNote: Ensure to replace ACCOUNT with your own ENO’s Account name, replace KEYBASEKEY with the key you obtained while signing up for Keybase
4.5 - Firewall Settings
How to configure your firewall in a validator-sentry configuration
These instructions assume a Validator-Sentry architecture.
Sentry Node
Apply these firewall settings on your sentry node
| |
Since the sentry node has pex enabled, connections from any machine to the p2p port (26656) needs to be allowed, so that other nodes can talk to the sentry for p2p communication of consensus messages.
The firewall settings above only allows ssh login from the given machine with IP-address IP, which should be the client machine you want to login from. This is good practice and limits the attack vector on your server.
Note that with a proper VPN solution, such as tailscale, this specific firewall rule can also be omitted, giving you the highest level of security. Tailscale can handle SSH login through its ACL access rules.
When done
| |
Validator Node
Apply these firewall settings on your validator node
| |
The validator firewall will be configured to make only outgoing p2p connections to the sentry nodes. Only allowing outgoing p2p connections to the sentry nodes further limits the attack vector on your validator node, since we don’t have to open the p2p port. See the manual setup guide on how to configure the sentry/validator correctly for this.
The firewall settings above only allows ssh login from the given machine with the give IP-address IP, which should be the client machine you want to login from.This is good practice and limits the attack vector on your server.
Note that with a proper VPN solution, such as tailscale, this specific firewall rule can also be omitted, giving you the highest level of security. Tailscale can handle SSH login through its ACL access rules.
If you have prometheus=true metrics logging enabled in the config.toml, you should allow the prometheus listen port as well.
| |
where IP is the address of your prometheus server.
When done
| |
Grafana
Additional services can be opened such as grafana as follows. I don’t recommend to run your grafana server on the same machine as your validator. This should be discouraged. Grafana typically uses port 3000.
| |
When done
| |
Prometheus
If you want to use Prometheus metrics, you should consult with the metrics exporter tool which port it uses for exporting metrics. Prometheus specific setup recommendations and installation instructions will be released shortly, when the nodebase releases its nodebase monitoring service.
5 - Testnet
Q&A all things related to Testnet
5.1 - Jailing
What is jailing and how can I unjail?
Table Of Contents
TL;DR: If a validator looses sync with the blockchain, they are punished (slashed) and delegator rewards are reduced. This is an incentive for the validator to monitor and maintaining their nodes on good infrastructure.
What is Jailing?
Validators are the active actors that ensure the integrity and security of the network. Their tasks consist — in a nutshell — of validating the transactions, voting on the next state of the blockchain and committing it when a consensus is reached.
To maintain a high level of security and performance on the network, a validator is supposed to keep signing and committing blocks permanently. However, a validator can fail to commit blocks due to multiple reasons, such as a connection loss or a server failure. To protect the network, and prevent any performance drop, an inactive validator needs to be eliminated from the validator list. In Cosmos based chains this process of temporarily eliminating a validator is called “Jailing”.
When am I Jailed?
A validator is jailed when they make liveness or Byzantine fault, when a validator is jailed, it will no longer be considered as an active validator until they are un-jailed. Furthermore, it cannot be un-jailed before downtime_jail_duration. This downtime_jail_duration is a network parameter which can be configured during genesis.
Important: When a validator is jailed because of a byzantine fault, their validator public key is added to a list of permanently banned validators and cannot re-join the network as a validator with the same public key, see staking tombstone
Network Parameters
The consensus params define the conditions for Jailing.
- signed_blocks_window: Number of blocks for which the liveness is calculated for uptime tracking
- min_signed_per_window: Maximum percentage of blocks with faulty/missed validations allowed for an account in last; signed_blocks_window blocks before it gets deactivated;
- downtime_jail_duration: Duration for Jailing
- slash_fraction_double_sign: Percentage of funds being slashed when validator makes a byzantine fault
- slash_fraction_downtime : Percentage of funds being slashed when a validator is non-live.
Network Parameters Aya
These parameters are in the genesis of the Aya-Sidechain.
| |
Slashing Mechanism:
Punishments for a validator are triggered when they either make a byzantine fault or become non-live.
Liveness Faults
A validator is said to be non-live when they fail to sign at least **min_signed_per_window blocks **(in percentage) in the last signed_blocks_window blocks successfully. signed_blocks_window and min_signed_per_window are network parameters and can be configured during genesis and can be updated during runtime by the governance module.
For example, if block_signing_window is 100 blocks and min_signed_per_window is 0.5,
validator will be marked as non-live and jailed
if they fail to successfully sign at least 100*0.5=50 blocks
in last 100 blocks.
When a validator fails to successfully sign missed_block_threshold blocks in last block_signing_window blocks, it is immediately jailed and punished by deducting funds from their bonded and unbonded amount and removing them from active validator set. The funds to be deducted are calculated based on slash_fraction_downtime.
Byzantine Faults
A validator is said to make a byzantine fault when they sign conflicting messages/blocks at the same height and round. Tendermint has mechanisms to publish evidence of validators that signed conflicting votes so they can be punished by the slashing module. For example:
Validator who votes for two different blocks within a single round (“Equivocation validator”/ “Double signing”);
Validator who signs commit messages for arbitrary application state ( “Lunatic validator”).
The evidence of a set of validators attempting to mislead a light client can also be detected and captured. However, even the Amnesia attack can be detected, punishment can not be applied at this stage, as we can not deduce the malicious validators.
Un-jailing
When a jailed validator wishes to resume normal operations (after downtime_jail_duration has passed), they can create anunjail transaction which marks them as un-jailed. Validator will then rejoin the validator set once it has been successful un-jailed
If the slashing mechanism is reducing your stake/voting power to zero you cannot unjail. In this case it is needed to increase your unslashed stake to regain voting power
Commands to unjail
| |
aliasOfYourAccount is the account name you used when installing the validator. The -a argument.
If you cannot unjail due to zero stake you first need to self-delegate the additional token we sent to you before performing the unjailing
| |
How can I find my validator address?
You can easily get the validator address using the Nodebase tool script showkeys.sh, located here
Source
https://crypto.org/docs/chain-details/module_slashing.html#overview slashing module | Crypto.org Chain
5.2 - Q&A
Questions and Answers all things Testnet
Table Of Contents
I don’t have a cosmovisor service?
The cosmovisor service is a daemon process to keep your node running. When the ayad process would exit, the service would automatically restart. So it has a vital function to keep your validator running healthy.
The cosmovisor service is installed during the node installation (install_node.sh), after your registered your node with the ENNFT. If you failed to register the node, and stopped the installation script, the installation didnt complete.
You can still register the ENNFT following the published instructions, but the cosmovisor service you would need to configure manually.
ayafix.sh is also part of the nodebase tools
Or you can install it manually from here as follows:
- copy the content below to a file ex. ayafix.sh
- chmod +x ayafix.sh
- sudo ./ayafix.sh
| |
What is my validator address?
The validator address is a function of the validator’s public key, which is used to sign prevotes and precommits.
Cosmos uses a bech32 encoded validator address, which is a more human-readable version of the same public key.
To retrieve your node’s address you can use our script addresses.sh in tools or do it manually as follows.
| |
The output will look like:
| |
With the address get the HEX presentation of it
| |
| |
Now parse the HEX address to get all bech32 representations
| |
The third entry with prefix ayavaloper is your validator address
| |
How to add a profile image to your validator for WM Explorer?
Written by Nodebase Team member Gertjan
- Go to the website https://keybase.io
- Create an account. This can be done by going to “Login” and after that choosing for “Join Keybase”
- Test if your account is working properly
- Logout of your account. On the home page of Keybase click the button “Install”
- Select the correct operating system and install the software
- Start the Keybase client on you computer and login with the account you created in step 2
- Change your profile image. This is the image that will show up in WM Explorer as your validator image
- Create a PGP key by selecting “Add a PGP key”
- Choose “Get a new PGP key”
- Fill in the form and click “Let the math begin”
- Click on the button “Done” in the dialog after
- You can now see a 16 character PGP key
- On your validator run the following command:
| |
- A transaction hash (txhash) is returned. Check in WM Explorer if the transaction was successful. If not, run the command in step 13 again
- After a successful transaction, your profile image will appear in WM Explorer
6 - Tutorials
Full step-by-step guides.
6.1 - Public DevNet Tutorials
Full step-by-step guides for Aya DevNet.
6.1.1 - 1. Offline, Air-Gapped, Machine creation for Aya Validator Cold Key Storage
Full Step by Step Guide for setting up an Offline, Air-Gapped, Machine to hold the offline, cold, Keys for your ENO Pool.
Written by Nodebase Team member intertree (Johnny Kelly)
Introduction
6.1.2 - 2. Validator Node Manual Installation
Full Installation Guide for installing a Validator Node
Written by Nodebase Team member intertree (Johnny Kelly)
Introduction
The following guide will take you through all manual steps to be taken to have a fully running Validator Node.
6.2 - Public Testnet Tutorials
Full step-by-step guides for Aya Public Testnet.
6.2.1 - 1. Sentry Node Manual Installation
Full Installation Guide for installing a sentry node
Written by Nodebase Team member intertree (Johnny Kelly)
Introduction
The following guide will take you through all manual steps to be taken to have a fully running Sentry Node ready to be attached to your later installed Validator.
This guide assumes you have already followed steps to set up a new user named wmt to run the Sentry Node software, and that you have taken proper steps to secure this username from being logged into from external machines.
Note: DO NOT follow this guide while logged in as the root user on your machine. This is bad practice. Make a sudo group user named wmt FIRST, and configure secure login to it using SSH keys.
Now, with that warning out of the way, we shall proceed with the guide!
Step-By-Step Installation Guide
Logged in as user wmt we first start by making the base directory structure for World Mobile’s ayad and Cosmovisor binaries that are to be installed on our Node.
We do this by entering the following group of commands
Note: There is no need to replace
"${USER}:${USER}"below with your own username, as${USER}is a system variable that will always be the currently logged on user. Which, in this case, should be userwmt.1 2 3 4 5 6sudo mkdir -p /opt/aya sudo chown "${USER}:${USER}" /opt/aya mkdir -p /opt/aya/cosmovisor/genesis/bin mkdir -p /opt/aya/backup mkdir -p /opt/aya/logs mkdir -p /opt/aya/configNext we set up our Node’s Aya Network Chain ID (depending on which Chain ID this Node will be running on)
We do this by entering the one of the following commands
Note: For the moment there is only one Chain ID for World Mobile Aya Chain Networks available publicly, but this will be changing soon and, as a result, there will be more than the single Chain ID option below to choose from. For now though, the single Chain ID option available is listed below.
For Aya Network Public Testnet:
1CHAIN_ID="aya_preview_501"Now we set up our Node’s Moniker (a friendly name for our Node to help identify it)
We do this by entering the following command
1moniker='node'Note:
'node'is an optional default Moniker we can use to create some ‘security by obscurity’ on the Aya Blockchain Network, by NOT having our publicly listed Sentry Node be named in any way that can be linked back to the name of our ENO. If a custom public Moniker is preferred, however, We can replace'node'with our own chosen name at this point, keeping the''s in place.Now we install a required prerequisite package (jq) for the successful completion of installation steps.
We do this by entering the following command
1 2sudo apt update sudo apt-get -q install jq -yNow we create an installation directory for the EarthNode installation files, navigate to it, download the installer zip file, install the unzip command (if not already installed to our OS), and extract the earthnode_installer archive.
We do this by entering the following group of commands
1 2 3 4 5 6mkdir ~/earthnode_installer cd ~/earthnode_installer wget https://github.com/max-hontar/aya-preview-binaries/releases/download/v0.4.1/aya_preview_501_installer_2023_09_04.zip sudo apt-get -q install unzip -y unzip aya_preview_501_installer_2023_09_04.zip rm aya_preview_501_installer_2023_09_04.zipNow we confirm that the included binaries for ayad and cosmovisor match their release_checksums values as provided by World Mobile. Check that the output of both commands match one another.
We do this by entering the following group of commands
1 2sha256sum ayad cosmovisor cat release_checksumsFollowing this confirmation step, we copy the ayad and cosmovisor binary files to their home locations for use in future operations.
We do this by entering the following group of commands
1 2cp ~/earthnode_installer/ayad /opt/aya/cosmovisor/genesis/bin/ayad cp ~/earthnode_installer/cosmovisor /opt/aya/cosmovisor/cosmovisorNow we initialise ayad to create all of the required configuration and set up files needed for running the cosmovisor and ayad binaries.
We do this by entering the following command
1./ayad init "${moniker}" --chain-id $CHAIN_ID --home /opt/ayaWe have now populated the /opt/aya directory and its subdirectories with the necessary files to configure our Node.
Next we copy across the genesis.json file used to kickstart the aya_preview_501 Blockchain Connection.
We do this by entering the following command
1cp ~/earthnode_installer/genesis.json /opt/aya/config/genesis.jsonBefore running our Sentry Node for the first time there are some initial configuration changes that need to be made to allow for smooth operation and connection the to aya_preview_501 Blockchain, and to ensure that connections between our own ENO Infrastructure’s Nodes remain robust.
So now we navigate to the aya config folder and open the config.toml file for our Sentry Node to make these changes.
We do this by entering the following group of commands
1 2cd /opt/aya/config nano config.tomlWe are now in the nano text editor, looking at the config.toml file contents for our Sentry Node.
Note: It is possible to search for the fields we need to edit more quickly by copying them from the below steps, pressing ctrl+w inside of nano in our terminal window, right clicking on the window, pasting the names of the values we need to edit, and pressing enter to jump to them.
We can also remove text blocks from a document that we wish to replace with new text blocks by holding down shift, selecting the existing rows we wish to remove, and then pressing ctrl+k to remove them.
We can then select and copy the replacement text from the steps shown in this guide below, and right click and paste the new settings into the terminal window.
We can undo any mistakes we’ve made while working inside nano by pressing alt+u
We now make the necessary changes to this file as follows
Change the statesync option to be enable = true instead of false
1 2 3 4 5 6 7 8 9 10####################################################### ### State Sync Configuration Options ### ####################################################### [statesync] # State sync rapidly bootstraps a new node by discovering, fetching, and restoring a state machine # snapshot from peers instead of fetching and replaying historical blocks. Requires some peers in # the network to take and serve state machine snapshots. State sync is not attempted if the node # has any local state (LastBlockHeight > 0). The node will have a truncated block history, # starting from the height of the snapshot. enable = trueChange the addr_book_strict option to be addr_book_strict = false instead of true
1 2 3# Set true for strict address routability rules # Set false for private or local networks addr_book_strict = falseSet the log_level to “error” instead of “info”
1log_level = "error"Set the public nodes supplied by World Mobile, that provide a statesync of historical Blockchain Data to our new Sentry Node, as persistent_peers
1 2# Comma separated list of nodes to keep persistent connections to persistent_peers = "692f6bb765ed3170db4fb5f5dfd27c54503d52d3@peer1-501.worldmobilelabs.com:26656,d1da4b1ad17ea35cf8c1713959b430a95743afcd@peer2-501.worldmobilelabs.com:26656"Set the public seed node supplied by World Mobile, that helps keep your Sentry Node’s P2P address book file up to date, as a seed in seeds
1 2# Comma separated list of seed nodes to connect to seeds = "7836955a4d42ed85a6adb13ae4f96806ab2fd9b2@peer3-501.worldmobilelabs.com:26656"Set the external_address = “” field to have our own Node’s Public IP address followed by our Node’s local connection Port (default 26656), so that it can broadcast this information to other nodes over P2P (replace x.x.x.x with our Node’s Public IP).
1 2 3 4 5 6# Address to advertise to peers for them to dial # If empty, will use the same port as the laddr, # and will introspect on the listener or use UPnP # to figure out the address. ip and port are required # example: 159.89.10.97:26656 external_address = "x.x.x.x:26656"
At this point the initial editing work to our config.toml file is done, and it can now be saved with these changes.
To save the config.toml file within nano editor we press ctrl+x and then press y, followed by enter. This will save the file with the same filename as before.
Next we need to make some initial changes to the app.toml file contents for our Sentry Node.
Luckily, the app.toml file we need to edit is in the same directory as config.toml.
So we do this by entering the following command
1nano app.tomlWe now make the necessary changes to this file as follows
- Replace GRPC port to not overlap with standard Prometheus port, replacing 9090 with 29090
1 2# Address defines the gRPC server address to bind to. address = "localhost:29090" - make sure the gas price units for our network to be 0uswmt
1 2 3 4# The minimum gas prices a validator is willing to accept for processing a # transaction. A transaction's fees must meet the minimum of any denomination # specified in this config (e.g. 0.25token1;0.0001token2). minimum-gas-prices = "0uswmt" - Change the API Configuration section enable option to be enable = true instead of false
1 2 3 4[api] # Enable defines if the API server should be enabled. enable = true
At this point the initial editing work to our app.toml file is done, and it can now be saved with these changes.
To save the app.toml file within nano editor we press ctrl+x and then press y, followed by enter. This will save the file with the same filename as before.
Now we need to export some environment variables to get our system ready to run our Sentry Node for the first time.
We do this by entering the following group of commands
1 2 3 4 5 6export DAEMON_NAME=ayad export DAEMON_HOME=/opt/aya export DAEMON_DATA_BACKUP_DIR=/opt/aya/backup export DAEMON_RESTART_AFTER_UPGRADE=true export DAEMON_ALLOW_DOWNLOAD_BINARIES=true ulimit -Sn 4096Before proceeding to start up our Sentry Node for the first time we will need to install some live monitoring software to see what it is doing once active.
We do this by entering the following group of commands
1 2 3 4 5 6cd ~/ mkdir nodebase-tools cd nodebase-tools wget -O ayaview.zip https://github.com/nodebasewm/download/blob/main/ayaview.zip?raw=true unzip ayaview.zip rm ayaview.zipWe will also quickly add a new Firewall Rule to our Server to allow Incoming connections to come into our Node once it has started.
What command we need to enter to do this will depend on how our Server is set up to handle Firewall Rules.
If our Server is using ufw to handle Firewall Rules (most likely for most installs) we need to enter the following command to accept Incoming connections over Port 26656 (a Sentry Node’s default Port)
1sudo ufw allow from any to any port 26656 proto tcpIf our Server is using iptables to handle Firewall Rules we need to enter the following group of commands to accept Incoming connections over Port 26656 (a Sentry Node’s default Port)
1 2sudo iptables -I INPUT -p tcp -m tcp --dport 26656 -j ACCEPT sudo service iptables saveIf we haven’t yet set up our Firewall Rules at all, we can follow the steps laid out over at Firewall Settings to do this.
With the Firewall Rule added we are now going to start up our Sentry Node for the first time, manually.
Note: Later we will be setting up a service file to have our Node automatically restart on Server reboot, or following a crash. For now though we will proceed manually.
We do this by entering the following group of commands
Note: There is a lot of automated scripting shown below that has to be run before first boot of Node to ensure that it will start to sync the chain. It will not be needed again for future start ups.
1 2 3 4 5 6 7 8 9 10 11 12 13 14 15 16INTERVAL=15000 LATEST_HEIGHT=$(curl -s "http://peer1-501.worldmobilelabs.com:26657/block" | jq -r .result.block.header.height) BLOCK_HEIGHT=$((($((LATEST_HEIGHT / INTERVAL)) - 1) * INTERVAL + $((INTERVAL / 2)))) TRUST_HASH=$(curl -s "http://peer1-501.worldmobilelabs.com:26657/block?height=${BLOCK_HEIGHT}" | jq -r .result.block_id.hash) # Set available RPC servers (at least two) required for light client snapshot verification sed -i -E "s|^(rpc_servers[[:space:]]+=[[:space:]]+).*$|\1\"http://peer1-501.worldmobilelabs.com:26657,http://peer2-501.worldmobilelabs.com:26657\"|" /opt/aya/config/config.toml # Set "safe" trusted block height sed -i -E "s|^(trust_height[[:space:]]+=[[:space:]]+).*$|\1$BLOCK_HEIGHT|" /opt/aya/config/config.toml # Set "qsafe" trusted block hash sed -i -E "s|^(trust_hash[[:space:]]+=[[:space:]]+).*$|\1\"$TRUST_HASH\"|" /opt/aya/config/config.toml # Set trust period, should be ~2/3 unbonding time (3 weeks for preview network) sed -i -E "s|^(trust_period[[:space:]]+=[[:space:]]+).*$|\1\"302h0m0s\"|" /opt/aya/config/config.toml cd ~/earthnode_installer /opt/aya/cosmovisor/cosmovisor run start --home /opt/aya &>>/opt/aya/logs/cosmovisor.log &We have now started our Node software for the first time!
Now we shall proceed to monitoring it.
We do this by entering the following group of commands
1 2cd ~/nodebase-tools ./ayaviewThe ayaview software will start up and visually show us the Blockchain data being downloaded to bring us up to date with the current tip of the chain.
We will know it has caught up to the current state of the Chain once the Block Height column stops counting up so quickly, and starts adding just 1 new Block Height to left hand table only around every 5-6 seconds.
Once we are up to date with the current tip of the Chain we need to do some tidy up work on both the config.toml and app.toml files that we edited before the first run of our Node.
We can do this by first pressing q on the ayaview console to quit out of it and then by entering the following group of commands
1 2cd /opt/aya/config/ nano config.tomlWe are now back in the nano text editor, looking at the config.toml file contents for our Sentry Node.
We now make the necessary changes to this file as follows
- change the statesync option to be enable = false instead of true
1 2 3 4 5 6 7 8 9 10####################################################### ### State Sync Configuration Options ### ####################################################### [statesync] # State sync rapidly bootstraps a new node by discovering, fetching, and restoring a state machine # snapshot from peers instead of fetching and replaying historical blocks. Requires some peers in # the network to take and serve state machine snapshots. State sync is not attempted if the node # has any local state (LastBlockHeight > 0). The node will have a truncated block history, # starting from the height of the snapshot. enable = falseAt this point the tidy up editing work to our config.toml file is done, and it can now be saved with these changes.
To save the config.toml file within nano editor we press ctrl+x and then press y, followed by enter. This will save the file with the same filename as before.
Next we need to make a change to the app.toml file contents for our Sentry Node.
We do this by entering the following command
1nano app.tomlAnd we edit the following section of the file to the below setting, changing it from being 0 to being 100.
Note: Setting the snapshot-interval to 100 will ensure that we can use our Sentry Node to kickstart our Validator later on. Which will allow us to set up our Validator without ever exposing its external IP to the rest of the Network.
1 2 3# snapshot-interval specifies the block interval at which local state sync snapshots are # taken (0 to disable). snapshot-interval = 100At this point the tidy up editing work to our app.toml file is done, and it can now be saved with these changes.
To save the app.toml file within nano editor we press ctrl+x and then press y, followed by enter. This will save the file with the same filename as before.
Note: These config.toml and app.toml file edits above should only be completed once we are SURE that our Node is up to date with the current state of the Chain. We DO NOT make this edit before our Node has fully synced to the current Block Height ayaview, and is adding a new Block around every 5-6 seconds.
At present, our Node should be running along nicely in the background and keeping up to date with the current state of the Chain, but we still have to complete some more steps before we have fully completed our Sentry Node’s initial set up.
First we need to ensure that we have saved all of our Node’s important data, needed for future reference both by tools and by us.
We do this by entering the following group of commands
1 2 3 4 5 6 7 8 9 10cd ~/earthnode_installer # Get the address of the validator validator_address=$(./ayad tendermint show-address --home /opt/aya) # Use 'jq' to create a JSON object with the 'moniker', 'operator_address' and 'validator_address' fields jq --arg key0 'moniker' \ --arg value0 "$moniker" \ --arg key1 'validator_address' \ --arg value1 "$validator_address" \ '. | .[$key0]=$value0 | .[$key1]=$value1' \ <<<'{}' | tee /opt/aya/sentry.jsonThis will save our Sentry Node’s data to the filename sentry.json in the /opt/aya directory.
Next we want to set up some symbolic links for the ‘ayad’ and ‘cosmovisor’ binaries so that their specific commands can be called from anywhere on our Node’s filesystem.
We do this by entering the following group of commands
1
2
sudo ln -s /opt/aya/cosmovisor/current/bin/ayad /usr/local/bin/ayad >/dev/null 2>&1 sudo ln -s /opt/aya/cosmovisor/cosmovisor /usr/local/bin/cosmovisor >/dev/null 2>&1And finally, we want to create a systemd service file that will allow our Node to automatically start on a reboot of our Server and to automatically attempt to restart itself on any crashes.
We do this by entering the following group of commands
1 2 3 4 5 6 7 8 9 10 11 12 13 14 15 16 17 18 19 20 21 22 23 24 25 26 27 28 29sudo tee /etc/systemd/system/cosmovisor.service > /dev/null <<EOF # Start the 'cosmovisor' daemon # Create a Systemd service file for the 'cosmovisor' daemon [Unit] Description=Aya Node After=network-online.target [Service] User=$USER # Start the 'cosmovisor' daemon with the 'run start' command and write output to journalctl ExecStart=$(which cosmovisor) run start --home /opt/aya # Restart the service if it fails Restart=always # Restart the service after 3 seconds if it fails RestartSec=3 # Set the maximum number of file descriptors LimitNOFILE=4096 # Set environment variables for data backups, automatic downloading of binaries, and automatic restarts after upgrades Environment="DAEMON_NAME=ayad" Environment="DAEMON_HOME=/opt/aya" Environment="DAEMON_DATA_BACKUP_DIR=/opt/aya/backup" Environment="DAEMON_ALLOW_DOWNLOAD_BINARIES=true" Environment="DAEMON_RESTART_AFTER_UPGRADE=true" [Install] # Start the service on system boot WantedBy=multi-user.target EOFThis will have added a new service file to our Server under the path /etc/systemd/system named cosmovisor.service. This service file is what will be called when the Server reboots, or if our Node crashes.
With the service now created, we now need to enable it for future use.
We do this by entering the following group of commands
1 2 3 4# Reload the Systemd daemon sudo systemctl daemon-reload # Enable the 'cosmovisor' service to start on system boot sudo systemctl enable cosmovisorWe can now confirm that our service is ready to be started by entering the following command.
1sudo systemctl status cosmovisor.serviceThis should show us the following
1 2 3○ cosmovisor.service - Aya Node Loaded: loaded (/etc/systemd/system/cosmovisor.service; enabled; vendor preset: enabled) Active: inactive (dead)If we see this, we know we have successfully installed our Aya Node Service.
All that remains now, is to close down our first run of our Node and to restart it using this newly installed Service instead of manually launching our Node as before.
To do this, we need to identify what the current process number of our still running first run Node is.
We do this by entering the following command
1ps -ef | grep cosmovisorThe output of this command should something like this
1 2 3wmt 33619 33486 0 03:11 pts/0 00:00:02 /opt/aya/cosmovisor/cosmovisor run start --home /opt/aya wmt 33625 33619 33 03:11 pts/0 00:16:16 /opt/aya/cosmovisor/genesis/bin/ayad start --home /opt/aya wmt 34703 33486 0 03:59 pts/0 00:00:00 grep --color=auto cosmovisorWhat we are looking for is the leftmost number appearing for the line that contains “/opt/aya/cosmovisor/cosmovisor run start –home /opt/aya” on its right hand side
In the above example, this number is 33619.
Our number will be different, and we need to take a note of it for the next step.
Once we have this number we can now use it to turn off our first run Node that has served us so well to get our Blockchain sync up to date with the current tip of the Chain.
We do this by entering the following command
Note: We replace
<number>with our noted number from above at this point, removing the surrounding <>1sudo kill <number>We have now killed our running Node, but don’t worry, we are going to bring it right back to life. Except this time, as a Service!
To do this we enter the following command
1sudo systemctl start cosmovisor.serviceNow we need to check that cosmovisor.service has started properly.
We do this by entering the following command
1sudo systemctl status cosmovisor.serviceWhen we ran this command previously it said our Aya Node Service was inactive (dead), this time it should say something like the following
1 2 3 4 5 6 7 8 9 10 11 12 13cosmovisor.service - Aya Node Loaded: loaded (/etc/systemd/system/cosmovisor.service; enabled; vendor preset: enabled) Active: active (running) since Wed 2023-03-01 04:06:05 UTC; 4s ago Main PID: 34791 (cosmovisor) Tasks: 15 (limit: 4573) Memory: 382.3M CPU: 5.063s CGroup: /system.slice/cosmovisor.service ├─34791 /usr/local/bin/cosmovisor run start --home /opt/aya └─34796 /opt/aya/cosmovisor/genesis/bin/ayad start --home /opt/aya Mar 01 04:06:05 localhost systemd[1]: Started Aya Node. Mar 01 04:06:05 localhost cosmovisor[34791]: 4:06AM INF running app args=["start","--home","/opt/aya"] module=cosmovisor path=/opt/aya/cosmovisor/genesis/bin/ayadSome details will be different to the above example, but this should be the general layout. The important point is that it should say ‘active (running)’ in green.
We can now confirm everything is continuing to sync from the Blockchain by going back to our ayaview console and watching to see if the Block Height is still slowly ticking upwards as before.
We do this by entering the following group of commands
1 2cd ~/nodebase-tools ./ayaviewIf everything is working as it should our ayaview console should now be showing us the Aya Blockchain ticking on by once more, around every 5-6 seconds.
And that’s it!!!
Congratulations! We have now successfully completed setting up a Sentry Node!
Note: At the moment though, our Sentry Node does not yet have a Validator that it connects to for protecting it, and passing on its Block Votes.
Which means it hasn’t yet got to fulfil its true purpose in life just yet (much like many of us).
So, to fix this, we will tackle connecting our newly set up Sentry Node to our EarthNode Validator, as well as any other running Sentry Nodes in our Infrastructure, in a separate guide.
For now though, we can simply bask in the glory of setting up a well running Sentry Node!
6.2.2 - 2. Validator Node Manual Installation
Full Installation Guide for installing a Validator Node
Written by Nodebase Team member intertree (Johnny Kelly)
Introduction
The following guide will take you through all manual steps to be taken to have a fully running Validator Node. Taking you through how attach it to your prevously installed Sentry Nodes, and how to register your EarthNode Stake Pool via both an On-Chain ENNFT Registration Transaction on the Cardano Network as well as an On-Chain Validator Registration Transaction on the Aya Network.
A number of elements of the set up process are very similiar to that of setting up a Sentry Node.
However additional steps will be required to ensure that the Validator only ever connects to other Nodes under your own control, so that your Validator Node’s ID and IP adddress are never publicised to the rest of the Blockchain Network.
This will require changing settings on both your existing Sentry Nodes and your newly set up Validator, to ensure proper cross connections are in place.
Details of what changes need to be made, on both sides, will appear in this guide.
This guide assumes you have already set up the Sentry Nodes that will be used to connect to this Validator using the steps laid out over at Sentry Node Manual Installation.
Note: In order for full Validator set-up to work without ever connecting to a World Mobile supplied Node, you will need to have two working Sentry Nodes in your Infrastructure.
As they will be acting as the two required RPC Servers to help kickstart your Validator syncing to the tip of the Chain.
This guide also assumes that all IP addresses being used to established cross connections between your Sentry Nodes and your Validator will be Private IP addresses, and that each will be visable to one another.
Note: In order for this to be the case all of your Nodes will need to appear under the same IP subnet. To achieve this within an Infrastructure in which you have Nodes running across either multiple Cloud Providers or a hybrid mix of Cloud and Baremetal Servers you will need to install and run a VPN Service that will make each of your Nodes appear to eachother as being on the same local network.
Setting up of such a VPN Service is outside the scope of this guide, but it is highly recommended that a VPN Service be used in any set up where Nodes do not already have Private IPs, on the same local subnet, that can be utilised for the task.
If all of your Nodes are running on the same Cloud Provider it is highly likely that they will already be running on the same Private IP subnet, and that that your Cloud Provider will make thse Private IPs available to you, but it must be highlighted that relying on a single Cloud Provider for all of your Node Infrastructure also creates a single point of failure for your EarthNode Stake Pool.
The level of acceptance you have for this single point of failure risk, is up to you.
And finally, this guide assumes you have already followed steps to set up a new user named wmt to run the Sentry Node software, and that you have taken proper steps to secure this username from being logged into from external machines.
Note: DO NOT follow this guide while logged in as the root user on your machine. This is bad practice. Make a sudo group user named wmt FIRST, and configure secure login to it using SSH keys.
Now, with this introduction, and its various warnings, out of the way, we shall proceed with the guide!
Step-By-Step Installation Guide
Logged in as user wmt we first start by making the base directory structure for World Mobile’s ayad and Cosmovisor binaries that are to be installed on our Node.
We do this by entering the following group of commands
Note: There is no need to replace
"${USER}:${USER}"below with your own username, as${USER}is a system variable that will always be the currently logged on user. Which, in this case, should be userwmt.1 2 3 4 5 6sudo mkdir -p /opt/aya sudo chown "${USER}:${USER}" /opt/aya mkdir -p /opt/aya/cosmovisor/genesis/bin mkdir -p /opt/aya/backup mkdir -p /opt/aya/logs mkdir -p /opt/aya/configNext we set up our Node’s Aya Network Chain ID (depending on which Chain ID this Node will be running on)
We do this by entering the one of the following commands
Note: For the moment there is only one Chain ID for World Mobile Aya Chain Networks available publicly, but this will be changing soon and, as a result, there will be more than the single Chain ID option below to choose from. For now though, the single Chain ID option available is listed below.
For Aya Network Public Testnet:
1CHAIN_ID="aya_preview_501"Now we set up our Node’s Account name (a friendly name for Our Operator Wallet Address that will be used to run our EarthNode Stake Pool) and Moniker (a friendly name for our Validator Node that will appear On-Chain for people to Delegate to). We will also save our Account name to a file for future reference.
We do this by entering the following group of commands
1 2 3account='<account>' moniker='<moniker>' echo "$account" > /opt/aya/accountNote: We replace
<account>and<moniker>with our own chosen names at this point, removing the surrounding <> They can be the same name.Now we install a required prerequisite package (jq) for the successful completion of installation steps.
We do this by entering the following command
1 2sudo apt-get update sudo apt-get -q install jq -yNow we create an installation directory for the EarthNode installation files, navigate to it, download the installer zip file, install the unzip command (if not already installed to our OS), and extract the earthnode_installer archive.
We do this by entering the following group of commands
1 2 3 4 5 6mkdir ~/earthnode_installer cd ~/earthnode_installer wget https://github.com/max-hontar/aya-preview-binaries/releases/download/v0.4.1/aya_preview_501_installer_2023_09_04.zip sudo apt-get -q install unzip -y unzip aya_preview_501_installer_2023_09_04.zip rm aya_preview_501_installer_2023_09_04.zipNow we confirm that the included binaries for ayad and cosmovisor match their release_checksums values as provided by World Mobile. Check that the output of both commands match one another.
We do this by entering the following group of commands
1 2sha256sum ayad cosmovisor cat release_checksumsFollowing this confirmation step, we copy the ayad and cosmovisor binary files to their home locations for use in future operations.
We do this by entering the following group of commands
1 2cp ~/earthnode_installer/ayad /opt/aya/cosmovisor/genesis/bin/ayad cp ~/earthnode_installer/cosmovisor /opt/aya/cosmovisor/cosmovisorNow we initialise ayad to create all of the required configuration and set up files needed for running the cosmovisor and ayad binaries.
We do this by entering the following command
1./ayad init "${moniker}" --chain-id $CHAIN_ID --home /opt/ayaWe have now populated the /opt/aya directory and its subdirectories with the necessary files to configure our Node.
Next we copy across the genesis.json file used to kickstart the aya_preview_501 Blockchain Connection.
We do this by entering the following command
1cp ~/earthnode_installer/genesis.json /opt/aya/config/genesis.jsonNow we are going to create a new Operator Account, and display its Seed Phrase.
We do this by entering the following group of commands
Note: During this step you will be asked to set up a spending password for your Account, this password will be needed when sending your On-Chain Validator Registration Transaction in a later step. Enter in a secure password to be used for this.
1 2 3 4 5 6 7 8 9# Create a new operator account and store the JSON output in the 'operator_json' variable operator_json=$(./ayad keys add "${account}" --output json --home /opt/aya) # Extract the address from the 'operator_json' variable and store it in the 'operator_address' variable operator_address=$(echo "$operator_json" | jq '.address' | sed 's/\"//g') # Display the mnemonic and address of the operator account echo -e "\n-- [ONLY FOR YOUR EYES] Store this information safely, the mnemonic is the only way to recover your account. \n" echo "$operator_json" | jq -MNote: This Operator Account is similar to a Cardano Wallet, and as such it will have along with it a Seed Phrase to allow for its future recovery. It is vitally important that we keep this Seed Phrase in a safe and secure location in case we ever need to recover our Account on a different machine in the future. The Operator Account is what controls our EarthNode Stake Pool’s Registration and Pool settings, so if we lose access to this Account we will lose access to our EarthNode Stake Pool altogether.
Next we are going to need the obtain our Validator Node’s Node ID in order to complete some work over on our already configured Sentry Nodes in the next section of the guide.
We do this by entering the following command
1./ayad tendermint show-node-id --home /opt/ayaNote: At this point we want to copy and paste the output of this command to a separate, temporary, text file on our machine for use in the Sentry Node section of this guide. Which is starting now.
Now we need to prepare our Sentry Nodes for connection from our Validator.
Note: During the following section of the guide work will be being done on both of our Sentry Nodes to make them ready for Validator first contact. However, to simplify the instructions, the steps to take on our Sentry Nodes will only be run through once.
We need to Make sure to complete the steps below on both of our Sentry Nodes. To do this, we will need to connect to each of them in separate terminal windows. Remember, these edits are not to be done on our Validator Node.
We also need to make sure to not close our existing Validator Node terminal window while working on the separate terminal windows of our already ocnfigured Sentry Nodes. As doing so will break future steps in Valdiator set up.
After connecting in a separate terminal window to our already configured Sentry Node we are now going to obtain its Node ID.
We do this by entering the following command
1ayad tendermint show-node-id --home /opt/ayaNote: At this point we want to copy and paste the output of this command to a separate temporary text file on our machine for use later in this guide.
Continuing on our already configured Sentry Node we are now going to make an edit to its config.toml file to allow for remote RPC connections.
We do this by entering the following group of commands
1 2cd /opt/aya/config nano config.tomlWe are now in the nano text editor, looking at the config.toml file contents for our already configured Sentry Node.
Note: It is possible to search for the fields we need to edit more quickly by copying them from the below steps, pressing ctrl+w inside of nano in our terminal window, right clicking on the window, pasting the names of the values we need to edit, and pressing enter to jump to them.
We can also remove text blocks from a document that we wish to replace with new text blocks by holding down shift, selecting the existing rows we wish to remove, and then pressing ctrl+k to remove them.
We can then select and copy the replacement text from the steps shown in this guide below, and right click and paste the new settings into the terminal window.
We can undo any mistakes we’ve made while working inside nano by pressing alt+u
We now make the necessary changes to this file as follows
- Add our Validator’s Node ID to unconditional_peer_ids
1 2# List of node IDs, to which a connection will be (re)established ignoring any existing limits unconditional_peer_ids = "<Validator Node ID>"
Note: We replace
<Validator Node ID>with our separately copied Validator Node ID from above at this point, removing the surrounding <>- Add our Validator’s Node ID to private_peer_ids
1 2# Comma separated list of peer IDs to keep private (will not be gossiped to other peers) private_peer_ids = "<Validator Node ID>"
Note: We replace
<Validator Node ID>with our separately copied Validator Node ID from above at this point, removing the surrounding <>- Set the laddr = “tcp://127.0.0.1:26657” field to be laddr = “tcp://0.0.0.0:26657” in the RPC Server Configuration Options section of the file.
1 2# TCP or UNIX socket address for the RPC server to listen on laddr = "tcp://0.0.0.0:26657"
At this point the editing work to our already configured Sentry Node’s config.toml file is done, and it can now be saved with these changes.
To save the config.toml file within nano editor we press ctrl+x and then press y, followed by enter. This will save the file with the same filename as before.
- Add our Validator’s Node ID to unconditional_peer_ids
Next we may need to make a change to the app.toml file contents for our already configured Sentry Node.
Luckily, the app.toml file we need to edit is in the same directory as config.toml.
So we do this by entering the following command
1nano app.tomlWe now make the necessary change to this file as follows
- Set snapshot interval to 100 instead of 0 to activate the snapshot manager
Note: It is quite possible that our already configured Sentry Node’s snapshot-interval is already set to be 100. If this is the case, no further changes are neccessary.
1 2 3# snapshot-interval specifies the block interval at which local state sync snapshots are # taken (0 to disable). snapshot-interval = 100At this point the editing work to our app.toml file is done, and it can now be saved with these changes.
To save the app.toml file within nano editor we press ctrl+x and then press y, followed by enter. This will save the file with the same filename as before.
Now we are going to add a new Firewall Rule on our already configured Sentry Node to Allow traffic from our Validator Node’s Private IP address to come in over Port 26657.
What command we need to enter to do this will depend on how our Server is set up to handle Firewall Rules.
If our Server is using ufw to handle Firewall Rules (most likely for most installs) we need to enter the following command
1sudo ufw allow from <Validator.Private.IP.address> to any port 26657 proto tcpIf our Server is using iptables to handle Firewall Rules we need to enter the following group of commands
1 2sudo iptables -I INPUT -p tcp -s <Validator.Private.IP.address> --dport 26657 -j ACCEPT sudo service iptables saveNote: We replace
<Validator.Node.Private.IP>with our Validator Node’s IP at this point, removing the surrounding <>Now we need to check that our changes didn’t do anything to prevent our already configured Sentry Node from being able to start up its cosmovisor Service.
We do this by entering the following group of commands
1 2sudo systemctl restart cosmovisor.service sudo systemctl status cosmovisor.serviceIf all of our changes have not caused any issues with our already configured Sentry Node’s cosmovisor Service we should see something very similar to the following output.
1 2 3 4 5 6 7 8 9 10 11 12 13 14● cosmovisor.service - Aya Node Loaded: loaded (/etc/systemd/system/cosmovisor.service; enabled; vendor preset: enabled) Active: active (running) since Wed 2023-03-15 16:27:02 UTC; 6s ago Main PID: 122758 (cosmovisor) Tasks: 15 (limit: 4660) Memory: 568.5M CPU: 9.121s CGroup: /system.slice/cosmovisor.service ├─122758 /usr/local/bin/cosmovisor run start --home /opt/aya └─122764 /opt/aya/cosmovisor/genesis/bin/ayad start --home /opt/aya Mar 15 16:27:02 wmt-sentry1 systemd[1]: Started Aya Node. Mar 15 16:27:02 wmt-sentry1 cosmovisor[122758]: 4:27PM INF running app args=["start","--home","/opt/aya"] module=cosmovisor path=/opt/aya/cosmovisor/genesis/bin/ayad Mar 15 16:27:08 wmt-sentry1 cosmovisor[122764]: 4:27PM ERR Error dialing peer err="dial tcp <Validator.Node.Private.IP>:26656: connect: connection refused" module=p2pNote: Even though we see a connect: connection refused error at this point this is only due to the fact that we haven’t yet started up our Validator for the first time. Seeing this error simply means our configuration has been laoded into our already configured Sentry Node successfully. Because we entered our Validator Node’s ID into the unconditional_peers section of the config.toml file, this should not pose an issue.
We have now concluded our required edits to our already configured Sentry Node’s set up. We need to make sure that we have completed the above steps to both of our Sentry Nodes.
We can now to return to our Valdiator Node to complete the rest of its set up.
Before running our Validator Node for the first time there are some initial configuration changes that need to be made to allow for smooth operation and connection the to aya_preview_501 Blockchain, and to ensure that connections between our own ENO Infrastructure’s Nodes remain robust.
So now we navigate to the aya config folder and open the config.toml file for our Validator Node to make these changes.
We do this by entering the following group of commands
1 2cd /opt/aya/config nano config.tomlWe are now in the nano text editor, looking at the config.toml file contents for our Validator Node.
We now make the necessary changes to this file as follows
Change the statesync option to be enable = true instead of false
1 2 3 4 5 6 7 8 9 10####################################################### ### State Sync Configuration Options ### ####################################################### [statesync] # State sync rapidly bootstraps a new node by discovering, fetching, and restoring a state machine # snapshot from peers instead of fetching and replaying historical blocks. Requires some peers in # the network to take and serve state machine snapshots. State sync is not attempted if the node # has any local state (LastBlockHeight > 0). The node will have a truncated block history, # starting from the height of the snapshot. enable = trueChange the pex option to be pex = false instead of true
1 2# Set true to enable the peer-exchange reactor pex = falseChange the addr_book_strict option to be addr_book_strict = false instead of true
1 2 3# Set true for strict address routability rules # Set false for private or local networks addr_book_strict = falseChange the persistent_peers_max_dial_period option to be persistent_peers_max_dial_period = “10s” instead of “0s”
1 2# Maximum pause when redialing a persistent peer (if zero, exponential backoff is used) persistent_peers_max_dial_period = "10s"Set the log_level to “error” instead of “info”
1log_level = "error"Set our already configured Sentry Nodes, that will seed Blockchain Data to our new Sentry Node, as persistent_peers
1 2# Comma separated list of nodes to keep persistent connections to persistent_peers = "<Sentry Node 1 Node ID>@<Sentry.Node1.Private.IP>:26656,<Sentry Node2 Node ID>@<Sentry.Node2.Private.IP>:26656"
Note: We replace
<Sentry Node 1 ID>and<Sentry Node 2 ID>with our separately copied Sentry Node IDs from above, as well as<Sentry.Node1.Private.IP>and<Sentry.Node2.Private.IP>with each of our already configured Sentry Node’s IPs, at this point, removing the surrounding <>- Add our alreay configured Sentry Node IDs to unconditional_peer_ids
1 2# List of node IDs, to which a connection will be (re)established ignoring any existing limits unconditional_peer_ids = "<Sentry Node 1 ID>,<Sentry Node 2 ID>"
Note: We replace
<Sentry Node 1 ID>and<Sentry Node 2 ID>with our separately copied Sentry Node IDs from above at this point, removing the surrounding <>At this point the initial editing work to our config.toml file is done, and it can now be saved with these changes.
To save the config.toml file within nano editor we press ctrl+x and then press y, followed by enter. This will save the file with the same filename as before.
Next we need to make some initial changes to the app.toml file contents for our Validator Node.
Luckily, the app.toml file we need to edit is in the same directory as config.toml.
So we do this by entering the following command
1nano app.tomlWe now make the necessary changes to this file as follows
- Replace GRPC port to not overlap with standard Prometheus port, replacing 9090 with 29090
1 2# Address defines the gRPC server address to bind to. address = "localhost:29090" - Make sure that the gas price units for our network are set to be 0uswmt
1 2 3 4# The minimum gas prices a validator is willing to accept for processing a # transaction. A transaction's fees must meet the minimum of any denomination # specified in this config (e.g. 0.25token1;0.0001token2). minimum-gas-prices = "0uswmt" - Change the API Configuration section enable option to be enable = true instead of false
1 2 3 4[api] # Enable defines if the API server should be enabled. enable = true
At this point the editing work to our app.toml file is done, and it can now be saved with these changes.
To save the app.toml file within nano editor we press ctrl+x and then press y, followed by enter. This will save the file with the same filename as before.
Now we need to export some environment variables to get our system ready to run our Validator Node for the first time.
We do this by entering the following group of commands
1
2
3
4
5
6
export DAEMON_NAME=ayad export DAEMON_HOME=/opt/aya export DAEMON_DATA_BACKUP_DIR=/opt/aya/backup export DAEMON_RESTART_AFTER_UPGRADE=true export DAEMON_ALLOW_DOWNLOAD_BINARIES=true ulimit -Sn 4096Before proceeding to start up our Valdiator Node for the first time we will need to install some live monitoring software to see what it is doing once active.
We do this by entering the following group of commands
1
2
3
4
5
6
cd ~/ mkdir nodebase-tools cd nodebase-tools wget -O ayaview.zip https://github.com/nodebasewm/download/blob/main/ayaview.zip?raw=true unzip ayaview.zip rm ayaview.zipNow we shall set up some variables that will be used in the next step to allow us to quickly manually start up our Validator, and let it begin its statesync process.
We do this by entering the following group of commands
Note: We need to make sure we have replaced <Sentry.Node1.Private.IP> and <Sentry.Node2.Private.IP> below with the Private IP addresses that come from each of our Sentry Nodes, removing the surrounding <>s, before entering this group of commands.
We can do this by copying the above group of commands below into a separate, temporary, text file and making any required edits before finally copying and pasting them into our Validator Node’s terminal window.
1 2RPC_PEER_1="<Sentry.Node1.Private.IP>" RPC_PEER_2="<Sentry.Node2.Private.IP>"At this point, before running our Node Software for the first time, we are going to check that our Firewall Rules are set up to match the recommended settings laid out over at Firewall Settings
We can check our Node’s current settings match by entering the following command
1sudo ufw status numberedIf they match we can carry on with the guide. If not, we will follow the Validator Firewall setup steps on the Firewall settings page and then continue with the guide.
With the Firewall Rules now verified or added, and our Sentry Nodes’ Private IP addresses set, we are now going to start up our Valdiator Node for the first time, manually.
Note: Later we will be setting up a service file to have our Node automatically restart on Server reboot, or following a crash. For now though we will proceed manually.
We do this by entering the following group of commands
Note: There is a lot of automated scripting shown below that has to be run before first boot of Node to ensure that it will start to sync the chain. It will not be needed again for future start ups.
We need to make sure that this whole set of commands below is copied and pasted into our Terminal window as a single, whole, blob, and is not entered piecemeal, in order for the blob to work properly.
1 2 3 4 5 6 7 8 9 10 11 12 13 14 15 16INTERVAL=100 LATEST_HEIGHT=$(curl -s ""${RPC_PEER_1}":26657/block" | jq -r .result.block.header.height) BLOCK_HEIGHT=$((($((LATEST_HEIGHT / INTERVAL)) - 1) * INTERVAL + $((INTERVAL / 2)))) TRUST_HASH=$(curl -s ""${RPC_PEER_1}":26657/block?height=${BLOCK_HEIGHT}" | jq -r .result.block_id.hash) # Set available RPC servers (at least two) required for light client snapshot verification sed -i -E "s|^(rpc_servers[[:space:]]+=[[:space:]]+).*$|\1\""${RPC_PEER_1}":26657,"${RPC_PEER_2}":26657\"|" /opt/aya/config/config.toml # Set "safe" trusted block height sed -i -E "s|^(trust_height[[:space:]]+=[[:space:]]+).*$|\1$BLOCK_HEIGHT|" /opt/aya/config/config.toml # Set "qsafe" trusted block hash sed -i -E "s|^(trust_hash[[:space:]]+=[[:space:]]+).*$|\1\"$TRUST_HASH\"|" /opt/aya/config/config.toml # Set trust period, should be ~2/3 unbonding time (3 weeks for preview network) sed -i -E "s|^(trust_period[[:space:]]+=[[:space:]]+).*$|\1\"302h0m0s\"|" /opt/aya/config/config.toml cd ~/earthnode_installer /opt/aya/cosmovisor/cosmovisor run start --home /opt/aya &>>/opt/aya/logs/cosmovisor.log &We have now started our Node software for the first time!
Now we shall proceed to monitoring it.
We do this by entering the following group of commands
1
2
cd ~/nodebase-tools ./ayaviewThe ayaview software will start up and visually show us the Blockchain data being downloaded to bring us up to date with the current tip of the chain.
We will know it has caught up to the current state of the Chain once the Block Height column stops counting up so quickly, and starts adding just 1 new Block Height to left hand table only around every 5-6 seconds.
Once we are up to date with the current tip of the Chain we need to do some tidy up work on both the config.toml and app.toml files that we edited before the first run of our Node.
We can do this by first pressing q on the ayaview console to quit out of it and then by entering the following group of commands
1
2
cd /opt/aya/config/ nano config.tomlWe are now back in the nano text editor, looking at the config.toml file contents for our Validator Node.
We now make the necessary changes to this file as follows
- change the statesync option to be enable = false instead of true
 1
 2
 3
 4
 5
 6
 7
 8
 9
10
####################################################### ### State Sync Configuration Options ### ####################################################### [statesync] # State sync rapidly bootstraps a new node by discovering, fetching, and restoring a state machine # snapshot from peers instead of fetching and replaying historical blocks. Requires some peers in # the network to take and serve state machine snapshots. State sync is not attempted if the node # has any local state (LastBlockHeight > 0). The node will have a truncated block history, # starting from the height of the snapshot. enable = falseAt this point the tidy up editing work to our config.toml file is done, and it can now be saved with these changes.
To save the config.toml file within nano editor we press ctrl+x and then press y, followed by enter. This will save the file with the same filename as before.
Note: This config.toml file edit above should only be completed once we are SURE that our Node is up to date with the current state of the Chain. We DO NOT make this edit before our Node has fully synced to the current Block Height ayaview, and is adding a new Block around every 5-6 seconds.
At present, our Node should be running along nicely in the background and keeping up to date with the current state of the Chain, but we still have to complete some more steps before we have fully completed our Valdiator Node’s initial set up.
First we to ensure that we have saved all of our Node’s important data, needed for future reference both by tools and by us.
We do this by entering the following group of commands
1 2 3 4 5 6 7 8 9 10 11 12 13 14cd ~/earthnode_installer # Get the address of the validator validator_address=$(./ayad tendermint show-address --home /opt/aya) # Use 'jq' to create a JSON object with the 'moniker', 'operator_address' and 'validator_address' fields jq --arg key0 'moniker' \ --arg value0 "$moniker" \ --arg key1 'operator_address' \ --arg value1 "$operator_address" \ --arg key2 'validator_address' \ --arg value2 "$validator_address" \ '. | .[$key0]=$value0 | .[$key1]=$value1 | .[$key2]=$value2' \ <<<'{}' | tee /opt/aya/registration.jsonThis will save our Validator Node’s data to the filename registration.json in the /opt/aya directory.
Next we want to set up some symbolic links for the ‘ayad’ and ‘cosmovisor’ binaries so that their specific commands can be called from anywhere on our Node’s filesystem.
We do this by entering the following group of commands
1 2sudo ln -s /opt/aya/cosmovisor/current/bin/ayad /usr/local/bin/ayad >/dev/null 2>&1 sudo ln -s /opt/aya/cosmovisor/cosmovisor /usr/local/bin/cosmovisor >/dev/null 2>&1And finally, we want to create a systemd service file that will allow our Node to automatically start on a reboot of our Server and to automatically attempt to restart itself on any crashes.
We do this by entering the following group of commands
1 2 3 4 5 6 7 8 9 10 11 12 13 14 15 16 17 18 19 20 21 22 23 24 25 26 27 28 29sudo tee /etc/systemd/system/cosmovisor.service > /dev/null <<EOF # Start the 'cosmovisor' daemon # Create a Systemd service file for the 'cosmovisor' daemon [Unit] Description=Aya Node After=network-online.target [Service] User=$USER # Start the 'cosmovisor' daemon with the 'run start' command and write output to journalctl ExecStart=$(which cosmovisor) run start --home /opt/aya # Restart the service if it fails Restart=always # Restart the service after 3 seconds if it fails RestartSec=3 # Set the maximum number of file descriptors LimitNOFILE=4096 # Set environment variables for data backups, automatic downloading of binaries, and automatic restarts after upgrades Environment="DAEMON_NAME=ayad" Environment="DAEMON_HOME=/opt/aya" Environment="DAEMON_DATA_BACKUP_DIR=/opt/aya/backup" Environment="DAEMON_ALLOW_DOWNLOAD_BINARIES=true" Environment="DAEMON_RESTART_AFTER_UPGRADE=true" [Install] # Start the service on system boot WantedBy=multi-user.target EOFThis will have added a new service file to our Server under the path /etc/systemd/system named cosmovisor.service. This service file is what will be called when the Server reboots, or if our Node crashes.
With the service now created, we now need to enable it for future use.
We do this by entering the following group of commands
1 2 3 4# Reload the Systemd daemon sudo systemctl daemon-reload # Enable the 'cosmovisor' service to start on system boot sudo systemctl enable cosmovisorWe can now confirm that our service is ready to be started by entering the following command.
1sudo systemctl status cosmovisor.serviceThis should show us the following
1 2 3○ cosmovisor.service - Aya Node Loaded: loaded (/etc/systemd/system/cosmovisor.service; enabled; vendor preset: enabled) Active: inactive (dead)If we see this, we know we have successfully installed our Aya Node Service.
All that remains now, is to close down our first run of our Node and to restart it using this newly installed Service instead of manually launching our Node as before.
To do this, we need to identify what the current process number of our still running first run Node is.
We do this by entering the following command
1ps -ef | grep cosmovisorThe output of this command should something like this
1 2 3wmt 147797 146916 0 16:44 pts/0 00:00:00 /opt/aya/cosmovisor/cosmovisor run start --home /opt/aya wmt 147803 147797 11 16:44 pts/0 00:01:05 /opt/aya/cosmovisor/genesis/bin/ayad start --home /opt/aya wmt 148235 146916 0 16:54 pts/0 00:00:00 grep --color=auto cosmovisorWhat we are looking for is the leftmost number appearing for the line that contains “/opt/aya/cosmovisor/cosmovisor run start –home /opt/aya” on its right hand side
In the above example, this number is 147797.
Our number will be different, and we need to take a note of it for the next step.
Once we have this number we can now use it to turn off our first run Node that has served us so well to get our Blockchain sync up to date with the current tip of the Chain.
We do this by entering the following command Note: We replace
<number>with our noted number from above at this point, removing the surrounding <>1sudo kill <number>We have now killed our running Node, but don’t worry, we are going to bring it right back to life. Except this time, as a Service!
To do this we enter the following command
1sudo systemctl start cosmovisor.serviceNow we need to check that cosmovisor.service has started properly.
We do this by entering the following command
1sudo systemctl status cosmovisor.serviceWhen we ran this command previously it said our Aya Node Service was inactive (dead), this time it should say something like the following
1 2 3 4 5 6 7 8 9 10 11 12 13cosmovisor.service - Aya Node Loaded: loaded (/etc/systemd/system/cosmovisor.service; enabled; vendor preset: enabled) Active: active (running) since Wed 2023-03-01 04:06:05 UTC; 4s ago Main PID: 34791 (cosmovisor) Tasks: 15 (limit: 4573) Memory: 382.3M CPU: 5.063s CGroup: /system.slice/cosmovisor.service ├─34791 /usr/local/bin/cosmovisor run start --home /opt/aya └─34796 /opt/aya/cosmovisor/genesis/bin/ayad start --home /opt/aya Mar 01 04:06:05 localhost systemd[1]: Started Aya Node. Mar 01 04:06:05 localhost cosmovisor[34791]: 4:06AM INF running app args=["start","--home","/opt/aya"] module=cosmovisor path=/opt/aya/cosmovisor/genesis/bin/ayadSome details will be different to the above example, but this should be the general layout. The important point is that it should say ‘active (running)’ in green.
We can now confirm everything is continuing to sync from the Blockchain by going back to our ayaview console and watching to see if the Block Height is still slowly ticking upwards as before.
We do this by entering the following group of commands
1 2cd ~/nodebase-tools ./ayaviewIf everything is working as it should our ayaview console should now be showing us the Aya Blockchain ticking on by once more, around every 5-6 seconds.
At this stage in the guide, we have successfully completed setting up a Validator Node that is able to privately sync with the Aya Blockchain, through only our already configured Sentry Nodes, but we have not yet used it to Register our EarthNode Stake Pool to both the Cardano and Aya Network Blockchains.
So, we shall now proceed to doing this.
Note: Before proceeding, we press q to leave ayaview.
First we need to obtain the details needed for our ENNFT Registration on the Cardano Blockchain side of the equation. We have actually already been shown them earlier, but let’s just get them again.
We do this by entering the following command
1cat /opt/aya/registration.jsonThe output of this command should look something like this
1 2 3 4 5{ "moniker": "<our Validator Node Moniker>", "operator_address": "<our Operator Address beginning aya1, followed by a random string of letters and numbers>", "validator_address": "<our Validator Address beginning ayavalcons1, followed by a random string of letters and numbers>" }Note: At this point we want to copy and paste the output of this command, including its surrounding {}s, to a separate, temporary, text file on our machine.
Now we need to open a web browser and navigate to https://tinyurl.com/wmeno and click on the EarthNode Registration tab at the top of the page.
Next we need to connect our Cardano Preview Testnet Wallet that contains our Testnet EarthNode NFT to be Registered to this EarthNode Registration site.
We do this by
a) Ensuring the Wallet containing our Testnet EarthNode NFT is the one currently selected for dApp connections in our Cardano Wallet Browser Extension b) Esnuring that it has enough collateral set to enable sumbission of Smart Contract Transactions (5 ADA should be enough) and then c) By clicking on the Connect Wallet Button on the site EarthNode Registration site
Note: Once our Preview Testnet Wallet is connected the EarthNode NFTs in your Wallet: section of the EarthNode Registration site should populate with the EarthNodeNFT# numbers that you hold in your Preview Testnet Wallet.
Now we need to click on the EarthNodeNFT# number we wish to associate with our newly set up Validator Node.
Next we make sure we have RegisterEarthNode selected under the Select Transaction Type: Dropdown Menu.
And now we need to paste in the previously copied information, obtained during step 30 above, into the Paste Installation Script Output: Box and press the Build Transaction Button.
Note: We will now be asked for our Preview Testnet Wallet’s Spending Password at this point in order to Authorise the Registration Transaction to be Posted On-Chain on the Cardano Preview Testnet Newtork.
We need to enter our Spending Password and click Sign.
This should then show us a Transaction Successful! message on the EarthNode Registration Page along with a Transaction Hash that corresponds to the Transaction ID that will appear on the Cardano Blockchain.
Note: Whilst the Transaction itself has now been successfully submitted, it may still take a little bit of time for it to appear On the Cardano Blockchain. There will be a link at the bottom of the EarthNode Registration site that will take us to an external page to reload until we see the Transcation finally go through. Once we see this Transaction appear on that page. We can proceed to the next step.
Now we return to our Validator Node’s Terminal Window as before, and complete the final steps to get our EarthNode Stake Pool online. The first thing we will do is make sure that our Operator Address received 5 uswmt Tokens to be able to complete the Aya Network side of our Stake Pool Registration.
We do this by entering the following command
1ayad query bank balances <our Operator Address> --home /opt/ayaNote: We replace
<our Operator Address>with the full operator_address detail that begins with aya1 from the information we obtained for EarthNode Registration in step 30, removing the surrounding <>If Registration on the Cardano Blockchain side has been successful, this command should give us the following output
1 2 3 4 5 6balances: - amount: "5" denom: uswmt pagination: next_key: null total: "0"Note: A balance amount of “5” appearing in this output means that The Cardano Transaction triggered our Operator Address being topped up with 5 uswmt to be used to set up our EarthNode Stake Pool on the Aya Blockchain side. The side we are now working with.
Now we need to Register our EarthNode Stake Pool to the Aya Blockchain Network.
We do this by entering the following group of commands
1 2 3 4 5 6 7 8 9 10 11 12 13ayad tx staking create-validator \ --amount=1uswmt \ --pubkey="$(ayad tendermint show-validator --home /opt/aya)" \ --moniker="$moniker" \ --chain-id="$CHAIN_ID" \ --commission-rate="0.10" \ --commission-max-rate="0.20" \ --commission-max-change-rate="0.01" \ --min-self-delegation="1" \ --from="$account" \ --home /opt/aya \ --output json \ --yesNote: After entering this group of commands we will be asked to enter the Spending Password we set up earlier in the guide specifically for our Validator Account. We must enter it now.
If the Transcation has been successful we should see an output that contains a txhash value that consists of a string of capital letters and numbers, along with a lot of other information in JSON format, that looks something like this
1{"height":"0","txhash":"<Transaction Hash containing capital letters and numbers>","codespace":"","code":0,"data":"","raw_log":"[]","logs":[],"info":"","gas_wanted":"0","gas_used":"0","tx":null,"timestamp":"","events":[]}Now we now need to go and see if our Validator has been successfully Registered on the Aya Blockchain Network by opening our browser and going to https://wmt-explorer.com/AyaChain
Once there we need to look at the ‘New joined EarthNode Validators’ section and check to see if the Monkier we gave our EarthNode Stake Pool has appeared in the list.
Finally, we need to go back to ayaview and make sure the status of our Node has been updated to say that the Validator reports Status: BONDED and Signing: Active. Which should be visable in the upper left box of the ayaview console.
We do this by entering the following group of commands
1
2
cd ~/nodebase-tools ./ayaview
If the Moniker appears om the wmt-exploer website, and ayaview reports what we are expecting to see above, Congratulations! We have now successfully completed setting up both our Validator Node AND our EarthNode Stake Pool!
6.2.3 - 3. Cardano Chain Follower Manual Installation and root-list Registration
Full Installation Guide for installing a Cardano Chain Follower Service and registering it to the Cardano Chain Follower root-list.
Written by Nodebase Team member intertree (Johnny Kelly)
Introduction
The following guide will take you through all manual steps to be taken to have a fully running Cardano Chain Follower. Taking you through how attach it to an existing public Cardano API Server, as well as how to register your EarthNode to the Cardano Chain Follower root-list via 2 On-Chain Registration Transactions on the Aya Network.
At the moment, this installation only requires set up through an existing On-Chain Registered Validator Node. In the future proxy connection methods may be introduced, but, for now, connections are directly made from your EarthNode Validator to a pre-configured Cardano API Server Endpoint.
This guide assumes you have already set up both of your Sentry Nodes and your EarthNode Validator, and have Registered your Validator to the Chain, using the steps laid out over at Sentry Node Manual Installation and Validator Node Manual Installation, respectively.
Now, with this introduction out of the way, we shall proceed with the guide!
Step-By-Step Installation Guide
Logged in as user wmt we first start by making the base directory for the Cardano Chain Follower files that are to be installed on our Node.
We do this by entering the following group of commands
1 2sudo mkdir -p /opt/aya/ccf sudo chown "${USER}:${USER}" /opt/aya/ccfNext we set the aya_home environment variable so that further installation steps can be simplified.
We do this by entering the following group of commands
1aya_home=/opt/ayaNow we install a required prerequisite package (libpq-dev) for the successful completion of installation steps.
We do this by entering the following group of commands
1 2sudo apt-get update sudo apt install libpq-dev -yNow we create an installation directory for the Cardano Chain Follower installation files, navigate to it, download the installer zip file, install the unzip command (if not already installed to our OS), and extract the Cardano Chain Follower archive.
We do this by entering the following group of commands
1 2 3 4 5 6 7mkdir ~/earthnode_installer/ mkdir ~/earthnode_installer/ccf cd ~/earthnode_installer/ccf wget https://cdn.discordapp.com/attachments/1072502970027081749/1144181313583186002/wm_230824_ccf_rev2.zip sudo apt-get -q install unzip -y unzip wm_230824_ccf_rev2.zip rm wm_230824_ccf_rev2.zipNow we copy the aya_chain_follower binary and daemon_wm.toml configuration files to their home locations for use in future operations.
We do this by entering the following group of commands
1 2cp ~/earthnode_installer/ccf/aya_chain_follower "${aya_home}"/ccf cp ~/earthnode_installer/ccf/daemon_wm.toml "${aya_home}"/ccfNext we want to create a systemd service file that will allow our Cardano Chain Follower to automatically start on a reboot of our Server and to automatically attempt to restart itself on any crashes.
We do this by entering the following group of commands
1 2 3 4 5 6 7 8 9 10 11 12 13 14 15 16 17 18 19 20 21 22sudo tee /etc/systemd/system/chain_follower.service > /dev/null <<EOF # Create systemd service file that describes the background service running the 'aya_chain_follower' daemon. [Unit] Description=Cardano Chain Follower After=network-online.target [Service] # Execute daemon from user account User=$USER # Set working directory WorkingDirectory=${aya_home}/ccf/ # Start the 'aya_chain_follower' daemon with providing configuration file path ExecStart=${aya_home}/ccf/aya_chain_follower daemon --config ${aya_home}/ccf/daemon_wm.toml # Restart the service if it fails Restart=always # Restart the service after 3 seconds if it fails RestartSec=3 [Install] # Start the service on system boot WantedBy=multi-user.target EOFThis will have added a new service file to our Server under the path /etc/systemd/system named chain_follower.service. This service file is what will be called when the Server reboots, or if our Service crashes.
With the service now created, we now need to enable it for future use.
We do this by entering the following group of commands
1 2 3 4# Reload the Systemd daemon sudo systemctl daemon-reload # Enable the 'chain_follower' service to start on system boot sudo systemctl enable chain_followerWe can now confirm that our service is ready to be started.
We do this by entering the following command
1sudo systemctl status chain_followerThis should show us the following
1 2 3○ chain_follower.service - Cardano Chain Follower Loaded: loaded (/etc/systemd/system/chain_follower.service; enabled; vendor preset: enabled) Active: inactive (dead)If we see this, we know we have successfully installed our Cardano Chain Follower Service.
Now we start the Cardano Chain Follower Service.
We do this by entering the following command
1sudo systemctl start chain_follower.serviceNow we need to check that chain_follower.service has started properly.
We do this by entering the following command
1sudo systemctl status chain_follower.serviceWhen we ran this command previously it said our Cardano Chain Follower Service was inactive (dead), this time it should say something like the following
1 2 3 4 5 6 7 8 9 10 11 12 13 14 15 16 17 18 19 20● chain_follower.service - Cardano Chain Follower Loaded: loaded (/etc/systemd/system/chain_follower.service; enabled; vendor preset: enabled) Active: active (running) since Fri 2023-09-08 14:52:46 UTC; 3s ago Main PID: 105986 (aya_chain_follo) Tasks: 15 (limit: 38243) Memory: 4.7M CPU: 96ms CGroup: /system.slice/chain_follower.service └─105986 /opt/aya/ccf/aya_chain_follower daemon --config /opt/aya/ccf/daemon_wm.toml Sep 08 14:52:46 eno318-validator aya_chain_follower[105986]: /api/info/asset/metadata/{fingerprint} Sep 08 14:52:46 eno318-validator aya_chain_follower[105986]: /api/info/history/discover/{hash} Sep 08 14:52:46 eno318-validator aya_chain_follower[105986]: /api/info/history/address/ Sep 08 14:52:46 eno318-validator aya_chain_follower[105986]: /api/info/address/stake/assets/ Sep 08 14:52:46 eno318-validator aya_chain_follower[105986]: /api/info/addresses/assets/ Sep 08 14:52:46 eno318-validator aya_chain_follower[105986]: /api/info/pools/{page} Sep 08 14:52:46 eno318-validator aya_chain_follower[105986]: /api/info/tokens/isNft/ Sep 08 14:52:46 eno318-validator aya_chain_follower[105986]: /api/aya/epoch/change/from/{epoch1}/{epoch2} Sep 08 14:52:46 eno318-validator aya_chain_follower[105986]: /api/aya/epoch/change/latest Sep 08 14:52:46 eno318-validator aya_chain_follower[105986]: /api/aya/epoch/current/Some details will be different to the above example, but this should be the general layout. The important point is that it should say ‘active (running)’ in green and there should be a list of ‘/api/’ items.
At this stage in the guide, we have successfully completed setting up a Cardano Chain Follower Service that is able to publically call the IOG Provided Cardano Testnet API Server (a potential privacy concern which may be addressed later by World Mobile in their guidance on how to set up these Services), but we have not yet used it to Register our EarthNode to the Cardano Chain Follower root-list.
So, we shall now proceed to doing this.
Note: Before proceeding, we press ctrl+c to leave the Service status view.
First we need to obtain our account name that was previously saved during out Validator’s set up process.
We do this by entering the following command
1cat /opt/aya/accountNote: The output of this command will be the name to replace the word
<account>with in the next step.Now we need submit our 1st of 2 Transactions to complete formal Registration to be a part of the Cardano Chain Follower Root list.
Note: The Root list is a list of all viable Registered Cardano Chain Follwer Validators that can be selected from to become a part of the Leader set in any given Epoch.
The Leader set are the smaller, rotating, sub-group of Validators from the overall root-list of Registered Validators that have the job of monitoring for specific Transaction information on the Cardano Blockchain, interpreting that information, and carrying out any actions that need to be taken on the Aya Network Blockchain as a result of that information.
Which Registered Cardano Chain Folllower Validators get to become a part of the current Leader set is determined by the Aya Chain itself, on a rotational basis.
We do this by entering the following command
1ayad tx cce set-val-acc --home /opt/aya --from <account> --chain-id aya_preview_501 -yNote: After entering this command we will be asked to enter the Spending Password we set up earlierin the previous guide used specifically to set up our Validator Account. We must enter it now.
Also, remember to replace
with the output of the previously completed cat command used to get this information. Also ensure to remove the <>s from the placeholder text above. If the Transcation has been successful we should see an output that contains a txhash value that consists of a string of capital letters and numbers, along with a lot of other information, that looks something like this
1 2 3 4 5 6 7 8 9 10 11 12 13code: 0 codespace: "" data: "" events: [] gas_used: "0" gas_wanted: "0" height: "0" info: "" logs: [] raw_log: '[]' timestamp: "" tx: null txhash: <Transaction Hash containing capital letters and numbers>Before proceeding to the next step, we need to wait long enough so that the 1st Registration step fully completed as expected. We are waiting for the Transaction that was just posted to the Aya Blockchain to make its way to a fully Minted Block, and to form a part of that Block’s list of Transactions.
We can look to see if and when this Transaction has made it to the Aya Blockchain by going to https://wmt-explorer.com/AyaChain.
Once there we need to look at the ‘Latest Transactions’ section and check to see if the ‘MsgSetValAcc’ Transaction we just sent has appeared on the Blockchain History.
When we see it appear, we can then move on to the next step.
Now we need submit our 2nd of 2 Transactions to complete formal Registration to be a part of the Cardano Chain Follower root-list.
We do this by entering the following command
1ayad tx chainfollower send-root --home /opt/aya --from <account> --chain-id aya_preview_501 -yNote: After entering this command we will once again be asked to enter the Spending Password we set up earlier in the previous guide used specifically to set up our Validator Account. We must enter it now.
Also, remember to replace
with the output of the previously completed cat command used to get this information. Also ensure to remove the <>s from the placeholder text above. If the Transcation has been successful we should see an output that contains a txhash value that consists of a string of capital letters and numbers, along with a lot of other information, that looks something like this
1 2 3 4 5 6 7 8 9 10 11 12 13code: 0 codespace: "" data: "" events: [] gas_used: "0" gas_wanted: "0" height: "0" info: "" logs: [] raw_log: '[]' timestamp: "" tx: null txhash: <Transaction Hash containing capital letters and numbers>Before proceeding to the next step, we need to wait long enough so that the 2nd Registration step fully completed as expected. We are waiting for the Transaction that was just posted to the Aya Blockchain to make its way to a fully Minted Block, and to form a part of that Block’s list of Transactions.
We can look to see if and when this Transaction has made it to the Aya Blockchain by going to https://wmt-explorer.com/AyaChain.
Once there we need to look at the ‘Latest Transactions’ section and check to see if the ‘MsgSendRoot’ Transaction we just sent has appeared on the Blockchain History.
Now we are going to complete the neccesary steps to ensure that our Validator is now actually a part of the Registered list of Cardano Chain Followers.
We will start by setting up our Validator’s operator address as a variable for future steps.
We do this by entering the following command
1operator_address=$(ayad tendermint show-address --home /opt/aya)Next we use that created variable to check to see if our newly Registered Chain Follower is in the list of Chain Follower roots.
We do this by entering the following command
1ayad query chainfollower list-root | grep $operator_addressWe are now checking to see if entering this command returns back a result that looks like the following, with the ayavalcons1 part of the response appearing fully in red.
1val_addr: ayavalcons1<various lowercase letters and numbers>
If it does, Congratulations! We have now successfully completed setting up our Validator to be a full Chain Follwer root-list!
7 - Contribution Guidelines
How to contribute to the docs
We welcome contributions to the docs!